

Best Cooler Accessories for Overlanding
Table of Contents
- Why Cooler Accessories Matter for Off-Road Travel
- Cooler Rack for Hard-Sided Cooler: The Foundation of Dry Food Storage
- Cooler Divider for Camping: Organizing Meals and Drinks
- Cooler Tie-Down Kit for Vehicle: Securing Your Cooler During Off-Road Adventures
- Cooler Accessories Comparison: Which Setup Fits Your Trip
- Compatibility and Fit: Measuring Your Cooler
- Building Your Complete Cooler Setup
- Frequently Asked Questions
Last Updated: October 21, 2026
Why Cooler Accessories Matter for Off-Road Travel
On a multi-day overlanding trip, your cooler becomes mission-critical, and choosing the best cooler accessories for overlanding makes all the difference.
The solution is elevation: keep food above the ice and meltwater and your cooler works like a fridge, drinks cold below, food dry above.
The best cooler accessories for overlanding solve three core problems: organization, food preservation, and space efficiency.
Cooler Rack for Hard-Sided Cooler: The Foundation of Dry Food Storage
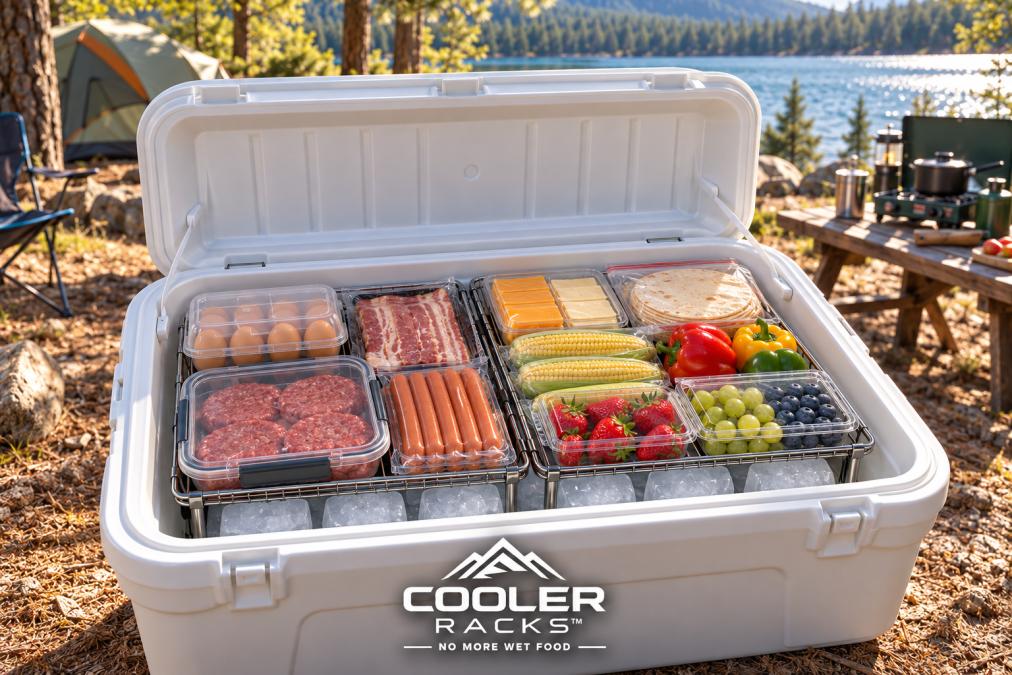
A cooler rack for hard-sided cooler is the core accessory that changes everything. It's a shelf system inside your cooler creating two zones: food above, ice and drinks below, preventing the soggy sandwich problem and keeping your cooler organized like a fridge.

The CR-SS-15 Full Size Cooler Rack measures 15″ long × 11″ wide × 7″ high; the CR-SS-10 Compact Cooler Rack is smaller at 10″ long × 11″ wide × 7″ high.
How Elevation Prevents Soggy Food
When food sits directly on ice, capillary action pulls meltwater into bread, produce, and packaging. A cooler rack lifts everything above the waterline, so only ice and drinks touch meltwater.
The 2 x 2-inch grid design of Cooler Racks™ racks lets loose ice pass through easily, creating a clean separation. Food stays in the dry zone, ice in the cold zone below, the difference between dry sandwiches on day three and soggy cardboard.
Stainless Steel vs. Plastic Alternatives
Material matters for durability and food safety. Premium 304 food-grade stainless steel resists rust, corrosion, and degradation after years of beach trips, fishing outings, and rough off-road travel. Stainless steel is dishwasher-safe and won't break when thrown in and out of a truck bed.
Cooler Racks™ racks use premium 304 stainless steel. No plastic parts, coatings, or assembly, and folding legs collapse for compact storage.
Cooler Divider for Camping: Organizing Meals and Drinks
A cooler divider for camping solves the organization problem. Instead of everything mixed together, you create separate zones: snacks on one side, meals on the other, drinks below.
A cooler rack system creates dividers through elevation and layout: one rack for main meals, a second for snacks and condiments, drinks and ice below.
Single vs. Dual Rack Setups
A single cooler rack works for day trips and small groups. One CR-SS-10 or CR-SS-15 gives you one elevated food zone.
A dual rack setup works for longer trips and larger groups. The Full Cooler System (25″) pairs one compact and one full-size rack; the Maximum Coverage Cooler Rack System (30″) uses two full-size racks.

Choose based on your cooler's interior dimensions and how you pack. Measure end-to-end length, width, and usable height before ordering; two racks end-to-end need 20-30 inches of length depending on configuration.
Cooler Tie-Down Kit for Vehicle: Securing Your Cooler During Off-Road Adventures
Off-road travel means washboard roads, steep descents, off-camber turns, and sudden braking. A 50-quart hard cooler packed with ice, drinks, and food can weigh well over 60 pounds, on a rough trail, that mass becomes a projectile. A cooler tie-down kit for vehicle keeps it anchored to the truck bed, roof rack, or cargo area so it doesn't shift, tip, or slam into passengers and gear.
The Four Mounting Approaches and When Each Makes Sense
There is no single best tie-down method.
1. Cam-buckle straps to factory tie-downs. The simplest, least expensive approach: two straps over the cooler anchored to factory D-rings or stake pockets.
2. Ratchet straps. Higher tension and less stretch than cam buckles, better for heavy hard-sided coolers on long trips.
3. Bolt-on D-ring and track systems. If your bed lacks good anchor points, bolt-on D-rings or L-track (logistic track) give you adjustable, rated anchors.
**4.
Anchor Points: Where to Attach and Where Not To
Attach to structural points: factory bed D-rings, stake pockets, seat-belt anchor bolts (with proper hardware), or a bolted track system. Avoid plastic bed rails, tonneau cover frames, and thin sheet-metal panels, these can tear out under load.
On a roof rack, use four-point attachment rather than two straps over the top, four points resist lateral shifting on off-camber sections.
Access, Cargo Space, and Safety Trade-Offs
A secured cooler is harder to open. Plan the layout so the lid opens without releasing straps, run straps over the ends or corners rather than across the lid, or use a bracket system that leaves the lid free.
Keep the cooler low and forward of the rear axle when possible, mounted high or behind the axle it raises the center of gravity and changes handling on descents.
A Simple Pre-Trip Check
Before you leave, grab the cooler and try to move it by hand. If it shifts more than an inch in any direction, add tension or an anchor point. Re-check after the first 30 minutes of rough road, straps settle once the vehicle flexes. A two-minute check at the trailhead prevents a cooler full of melted ice and broken containers later.
Cooler Accessories Comparison: Which Setup Fits Your Trip
Choosing the right cooler accessories for overlanding depends on three factors: cooler size, trip length, and group size.
Quick Comparison Table
| Setup | Best For | Interior Length Needed | Price | Key Benefit |
|---|---|---|---|---|
| CR-SS-10 Compact Rack | Day trips, small coolers | 10" minimum | $29.99 | Lightweight, portable, fits tight spaces |
| CR-SS-15 Full Size Rack | Weekend trips, larger coolers | 15" minimum | $34.99 | More food storage, still compact |
| Double Cooler Rack Setup (20″) | Couples, small groups | 20" minimum | $54.99 | Two separate food zones, dual organization |
| Full Cooler System (25″) | Small families, mixed trips | 25" minimum | $59.99 | Best seller, balanced organization |
| Maximum Coverage (30″) | Large groups, week-long trips | 30" minimum | $64.99 | Maximum food storage, two full-size racks |
Sizing Your Cooler Accessories
Your cooler's interior dimensions determine which rack you need. Don't go by capacity or brand name, a 50-quart cooler might have 20 inches of usable interior length, while another 50-quart model has only 18.

Measure three dimensions: interior length (end to end), interior width (side to side), and usable interior height (bottom to where the lid closes).
For dual-rack setups, add the lengths together: two CR-SS-10 racks need 20 inches minimum, two CR-SS-15 racks need 30.
Compatibility and Fit: Measuring Your Cooler
Most cooler accessory returns happen for one reason: the buyer measured the outside of the cooler instead of the inside. Exterior dimensions tell you whether the cooler fits in your truck; interior dimensions tell you whether an accessory fits in the cooler. Here's a repeatable way to measure once and buy right.
The Three Measurements That Matter
Use a tape measure and record each number to the nearest quarter inch. Write them down, don't rely on memory.
1. Interior length (end to end). Measure along the longest inside dimension at the widest point.
2. Interior width (side to side). Same method: measure at the top and near the floor, use the smaller number.
**3.
A Fit Framework You Can Apply to Any Accessory
Once you have those three numbers, apply these rules:
- Length and width: The accessory's footprint should be at least a half inch smaller than the interior length and width on each side, so you can get fingers under the edges and cold air can circulate.
- Height: Add the accessory's height to the tallest container you plan to put on it. If the total exceeds your usable interior height, the accessory or the container has to change.
- Multiple accessories: Two accessories end to end need their lengths plus a half inch of gap between them and a half inch at each end, two 10-inch accessories need roughly 21 inches, not 20.
Why Quart Capacity Is a Poor Fit Guide
Quart ratings describe volume, not shape. Two 50-quart coolers can differ by several inches of interior length depending on wall thickness, insulation, and whether the cooler is rotomolded or injection-molded. Rotomolded coolers have thicker walls and less interior space for the same footprint. Never choose an accessory by quart rating alone, the tape measure is the only reliable guide.
Checking Fit Before You Order
Measure first, then compare your numbers to the accessory's published dimensions, not a photo. If the seller publishes a compatibility list by cooler model, use it as a starting point but confirm with your own measurements, manufacturers sometimes revise interior molds without changing the model name. If your cooler isn't listed, send the seller your three measurements and ask for fit confirmation in writing.
When an Accessory Does Not Fit
If an accessory arrives too long or too wide, don't force it. Forcing a rack or divider into a tapered cooler can crack it, scratch the liner, or wedge it so tightly you can't remove it with wet hands. Return it and size down, or switch to a smaller accessory plus a second unit end to end.
Building Your Complete Cooler Setup
A complete cooler setup combines the right rack, a proper packing strategy, and maintenance habits.
Packing Strategy for Maximum Ice Retention
Start with block ice, not cubes, it melts slower because it has less surface area.
Put your rack on top of the block ice and load food containers, wrapped items, and packaged goods on it.
A Fridge Mode™ setup with Cooler Racks™ is essentially a passive refrigerator: food sits dry and organized above, ice stays below, no electricity needed.
Maintenance and Durability for Long-Term Use
Stainless steel racks require minimal maintenance. Rinse after each trip, wipe dry if you see salt water or sand, and dishwasher-safe food-grade stainless steel handles the rest.
Check the cooler itself for cracks or damage, a damaged cooler won't hold ice no matter how good your rack is.
Overlanding demands gear that works reliably in tough conditions.
Cooler Racks™ makes this simple: choose your rack size based on your cooler's interior dimensions, pair it with block ice, and pack strategically. Shop Cooler Racks and get the Full Cooler System (25″) or Maximum Coverage Cooler Rack System (30″) to start your next adventure with dry food, cold drinks, and zero soggy sandwiches.
Frequently Asked Questions
What accessories are most important for keeping food dry during overlanding trips?
A cooler rack for hard-sided cooler is the most critical accessory. It elevates food above melted ice and water, keeping sandwiches, produce, and containers completely dry. Pair this with a divider or second rack to organize meals separately from drinks and ice. Together, these create a fridge-like setup that prevents soggy food throughout multi-day camping and off-road adventures.
How do cooler dividers for camping improve food organization?
A cooler divider for camping creates separate zones inside your cooler without wasting space. Using two racks, one for meals and one for snacks, lets you grab what you need without digging through ice. For overlanding trips where you're accessing your cooler multiple times daily, this saves time and keeps your setup efficient.
Do I need a cooler tie-down kit for vehicle security during off-road travel?
Yes, a cooler tie-down kit for vehicle is essential for overlanding. Rough terrain, river crossings, and steep climbs can shift cargo inside your truck bed. Securing your cooler prevents it from sliding, tipping, or being damaged during bumpy sections. This is especially important if you're carrying expensive cooler accessories or extended supplies for longer expeditions. Proper tie-down systems also protect other gear from being crushed by a shifting cooler.
How do I know which size cooler rack will fit my cooler?
Measure your cooler's interior length, width, and usable height. The CR-SS-10 Compact Cooler Rack requires at least 10″ of interior length, 11″ of interior width, and 7″ of usable interior height, while the CR-SS-15 Full Size needs at least 15″ of interior length, 11″ of interior width, and 7″ of usable interior height. Check the Size Guide on the Cooler Racks website for verified compatibility with your specific cooler model. Choosing by interior measurements, not cooler capacity or brand alone, ensures a perfect fit.
Can I use cooler accessories on soft-sided coolers, or are they only for hard-sided models?
Cooler racks and dividers are designed specifically for hard-sided coolers. Soft-sided coolers lack the rigid internal structure needed to support an elevated rack. If you primarily use soft-sided coolers for overlanding, focus on ice packs, drain plugs, and block ice arrangements instead. Hard-sided coolers paired with proper accessories deliver superior food organization and ice retention for extended off-road trips.