

7 Best Cooler Accessories for Organized Camping
Last Updated: October 30, 2026
Quick Summary
The best cooler accessories for organized camping are a stainless rack that elevates food above the ice, divider panels that separate drinks from food, rigid food containers, and block ice. Together these cooler accessories keep meals dry and reachable instead of sitting in meltwater.
- Pack in layers: ice and drinks on the bottom, a rack or divider in the middle, food on top.
- The CR-SS-15 Full Size Cooler Rack measures 15 x 11 x 7 inches and costs $34.99.
- Your cooler needs at least 11 inches of interior width and 7 inches of usable interior height for a rack.
- Drain meltwater every morning through the cooler's plug on multi-day trips.
- Skip cup holders and lids, since they have no effect on food or ice.
Table of Contents
- Why Cooler Accessories Make or Break Camping Food Storage
- How to Organize a Camping Cooler: The Food-Above-Ice System
- The Cooler Rack for Food: Elevation That Keeps Meals Dry
- Cooler Divider for Camping: Separating Drinks, Food, and Gear
- How to Keep Food Dry in a Cooler on Multi-Day Trips
- Cooler Accessories Worth the Cost (and What to Skip)
- Match Accessories to Your Camping Scenario
- Build Your Cooler Setup Before Your Next Trip
- Frequently Asked Questions
Why Cooler Accessories Make or Break Camping Food Storage
The best cooler accessories for organized camping solve a problem every camper recognizes: food that ends up sitting in meltwater by day two. At Cooler Racks™, we build gear around one idea, keeping food above the ice and drinks below it, and that focus shapes every recommendation here.
Cooler accessories are add-on components, such as racks, dividers, baskets, and ice packs, that change how you pack and reach food inside a cooler. They don't make the ice last longer. They change what happens to your food while the ice melts.
That distinction matters more than most buying guides admit. A premium cooler with excellent ice retention still turns into a soggy mess if sandwiches sit directly on melting ice. The USDA Food Safety and Inspection Service guidance on keeping food cold makes the stakes clear: perishable food left above 40°F for more than two hours should be discarded.
Below, we break down seven accessories worth packing, how to build a system around them, and which ones you can skip.
How to Organize a Camping Cooler: The Food-Above-Ice System
Organizing a camping cooler means separating three layers: ice and drinks on the bottom, a rigid barrier in the middle, and food on top. This is the food-above-ice system, and it works because cold air and meltwater stay below your food instead of soaking through it.
Here is the packing order we recommend:
- Block ice or ice packs go on the cooler floor, spread evenly.
- Drinks fill the gaps around the ice, where they chill fastest and act as thermal mass.
- A rack or divider creates the barrier layer.
- Food containers sit on top, grouped by meal or by day.
- Loose ice goes in a separate bag or stays below the rack grid, never on your food.
The layering approach mirrors how a refrigerator works: cold below, food above, nothing submerged. Most campers pack by cramming items wherever they fit. That is why they end up digging through icy water at lunch.
The Cooler Rack for Food: Elevation That Keeps Meals Dry
A cooler rack for food is a rigid platform with legs that holds food several inches above the ice line. It is the single most effective accessory for keeping sandwiches, produce, and containers out of meltwater.
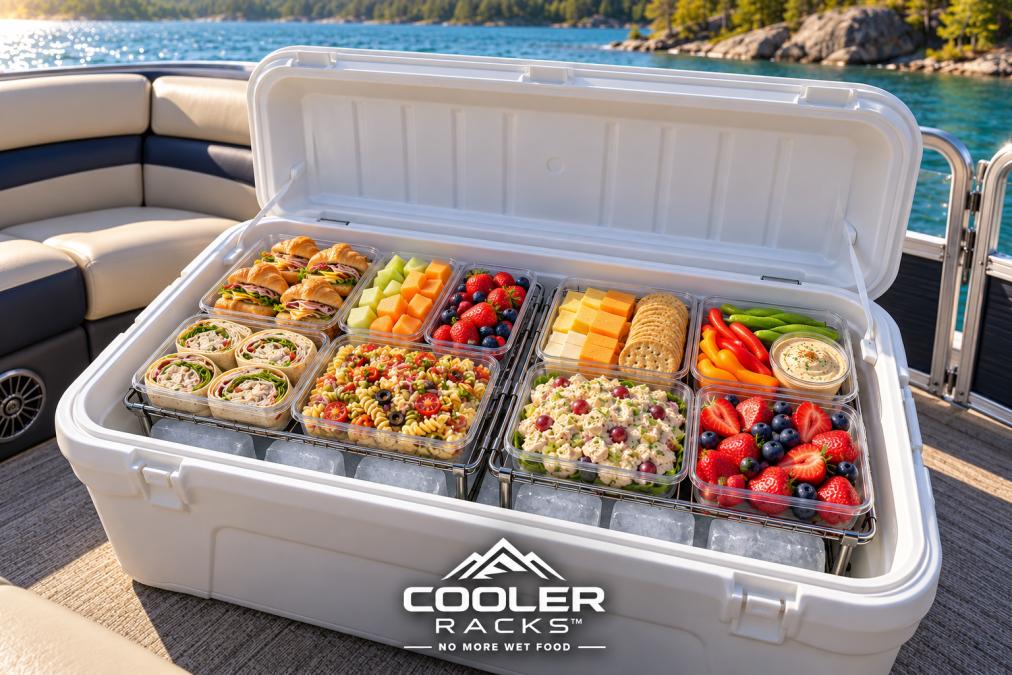
Our CR-SS-15 Full Size Cooler Rack does exactly this. It measures 15 x 11 x 7 inches, giving you 7 inches of elevation, and it's built from premium 304 stainless steel with folding legs and a 2 x 2-inch grid that lets loose ice drain through. It's rust-resistant and dishwasher safe. At $34.99, it's priced for repeated trips.
Picking the Right Rack Size for Your Cooler
Measure the inside of your cooler before you buy anything. Your cooler needs at least 11 inches of interior width and 7 inches of usable interior height, and the length depends on which rack you choose. Measure inside your cooler before ordering.
The CR-SS-10 Compact Cooler Rack needs 10 inches of interior length and costs $29.99. If you're deciding between one rack and two sizes for your trip, see our guide on one cooler rack vs two sizes. The CR-SS-15 needs 15 inches and costs $34.99. If you want two elevated zones, the Full Cooler System pairs one of each for $59.99 and fits coolers with at least 25 inches of interior length. For a smaller cooler, the compact rack is a good fit.


Cooler Divider for Camping: Separating Drinks, Food, and Gear
A cooler divider for camping splits the interior into zones so drinks, food, and gear stop mixing. Dividers work best alongside a rack, not instead of one: the divider handles horizontal separation while the rack handles vertical separation. The practical benefit is speed. When drinks have their own zone, you open the lid once at lunch instead of rummaging through everything, and less lid-open time helps ice retention.
Most buying guides stop at "buy a divider." The harder question is fit.
Three divider types cover most setups, each with different fit and trade-off profiles:
- Vertical snap-in panels split a large cooler into drink and food halves. They offer the most rigid separation, but they only fit coolers with molded slots or a flat interior wall. Measure the slot spacing and panel height; a panel that sits above the lid line will prevent the lid from sealing.
- Hanging baskets clip to the cooler rim for snacks and dry goods. They add vertical storage without taking floor space, but they reduce usable height for tall items and can interfere with the lid gasket if the clips are thick. Check that the basket's clip depth clears your cooler's rim thickness.
- Mesh bags for loose items like fruit and wrapped sandwiches. They are the most flexible and cheapest option, but they offer no structural separation and can snag on rack legs. Use them inside a rigid zone rather than as the only divider.
For specific divider picks and fit notes by cooler model, see our roundup of the best cooler dividers for food and drinks.
How to Keep Food Dry in a Cooler on Multi-Day Trips
Keeping food dry on a multi-day trip comes down to four habits: elevate the food, seal it twice, drain the cooler daily, and restock ice before it fully melts. Weekend trips forgive sloppy packing. Day three of a five-day trip does not.
Pair block ice with our rack in what we call Fridge Mode™: organized food storage above the ice without electricity. Actual cooling duration depends on your cooler, the ice, weather, and how often the lid opens.
Then follow this routine:
- Double-bag anything that could leak, and use rigid containers for soft foods.
- Drain meltwater every morning through the cooler's plug.
- Keep a separate small cooler for items you'll open frequently, so the main cooler stays shut.
- Label containers by day so nobody digs for the wrong meal.
For a deeper walkthrough of this method, read our step-by-step guide on how to keep food dry in a cooler.
Cooler Accessories Worth the Cost (and What to Skip)
Most cooler accessories fall into two groups: those that protect your food and those that just take up space. Here's our honest breakdown.
| Accessory | What It Does | Worth It? | Why |
|---|---|---|---|
| Stainless rack | Elevates food above ice | Yes | Directly prevents soggy food |
| Divider panels | Separate drinks from food | Yes | Faster access, less lid-open time |
| Rigid food containers | Seal food from water | Yes | Cheap insurance against leaks |
| Block ice | Slower melt, less water | Yes | Fewer drain cycles |
| Hanging baskets | Hold snacks off the floor | Sometimes | Useful in large coolers only |
| Cup holders and lids | Convenience add-ons | Skip | No effect on food or ice |
| Cooler carts | Move a loaded cooler | Situational | Only if you haul long distances |
The pattern is simple. Buy accessories that separate food from water. Skip accessories that only add convenience without changing how the cooler performs.
Match Accessories to Your Camping Scenario
The right setup depends on how long you're out, how many people you're feeding, and how often the cooler gets opened. Instead of one-size-fits-all advice, build the accessory mix around the scenario.
Weekend car camping (two days, two to four people): one CR-SS-10 Compact Cooler Rack. The compact rack gives enough elevation for food during a two-day trip and folds flat for storage between trips.
Family road trip or beach day (one to three days, four or more people): the Full Cooler System in a mid-size cooler. Two elevated zones let you separate kids' snacks from meal ingredients.
Fishing or boating (day trip with a catch): the Maximum Coverage System with two full-size racks, keeping your catch and your lunch in separate zones.
Group camping or overlanding (four or more days): the Double Cooler Rack Setup in a large cooler, giving two elevated food zones for a group.
Tailgating (same-day event): a single full-size rack to keep food organized above the ice.
Best for: campers who want food dry and reachable without digging. Skip if: you only use a soft cooler, since our racks are designed for hard-sided coolers.
Build Your Cooler Setup Before Your Next Trip
Meltwater will show up in most coolers. Keeping food above it is the part you control.
If you want the simplest fix, start with a single stainless rack. If you're outfitting a family cooler or a long trip, the Full Cooler System gives you two elevated zones for $59.99, with premium 304 stainless steel construction, folding legs, dishwasher-safe cleanup, and no assembly required.
Get started with Cooler Racks™ and pack your next cooler so food stays dry above and drinks stay cold below.
Frequently Asked Questions
What accessories help keep a camping cooler organized?
The most effective setup uses an elevated rack, a divider, and labeled containers. A stainless steel cooler rack lifts food above meltwater so sandwiches and produce stay dry, while a divider or basket separates drinks from meals. Clear food containers group snacks and perishables, and labeled bins make dry goods easy to find. Together these cooler accessories turn a jumbled ice chest into a fridge-like layout where everything has a place and nothing soaks.
How do you keep food from getting wet in a cooler?
Keep food out of direct contact with ice and meltwater. A cooler rack for food raises items 7 inches above the ice, and block ice melts more slowly than cubed ice, reducing water buildup. Use sealed containers for perishables, drain the cooler daily, and pack drinks below the rack. This combination keeps food dry in a cooler even on multi-day trips, and the rack's grid lets loose ice pass through instead of pooling around your meals.
Are cooler racks useful for camping?
Yes, especially for trips longer than a day. A cooler rack creates a second storage level so food stays above ice and meltwater, which means no soggy sandwiches and no digging through ice to find items. Cooler Racks' stainless steel models fit most hard-sided coolers, fold flat for storage, and are dishwasher safe. For weekend trips or extended stays, the rack turns a standard cooler into an organized food storage system.
How do you separate drinks from food in a cooler?
Use a two-level system: drinks and loose ice go on the bottom, food sits on an elevated rack above. A cooler divider for camping or a rack's grid keeps the zones distinct, so you grab a drink without disturbing the food. Pack drinks in a dedicated section, keep food in labeled containers on the rack, and avoid mixing loose items. This separation also helps cold air circulate and keeps the cooler easier to repack at the end of the day.
How can you keep a cooler organized on a road trip?
Start with a plan before you pack: group food by meal, use clear containers, and place a rack on top of the ice. Put heavy items and drinks at the bottom, perishables on the rack, and snacks in a small bin near the lid. Label bins for dry goods and keep a small trash bag handy. On the road, repack after each stop and drain meltwater daily so the cooler stays organized and food stays dry for the whole trip.
