

Best Cooler Setup for Overlanding: A Complete Guide
Last Updated: October 28, 2026
Quick Summary
A complete overlanding cooler setup combines a hard-sided cooler, an interior organizer such as a stainless steel rack, a cold-storage plan, and a power source if you run a 12V fridge. The rack lifts food above meltwater, keeping it dry and organized between resupply stops. Size the cooler to your trip length and group, not to your vehicle.
- Use hard-sided coolers only, since Cooler Racks are designed for them.
- Measure interior length, width, and at least 7 inches of usable height before buying.
- Stainless steel racks lift food 7 inches above cold water, keeping it dry.
- Budget a 12V fridge's daily amp-hours against battery capacity before leaving.
- Mount coolers with rated cam or ratcheting straps, never bungee cords.
Table of Contents
- What a Complete Overlanding Cooler Setup Includes
- Hard-Sided vs Soft-Sided Cooler: Which Holds Up Off-Road
- Sizing Your Cooler by Trip Length and Group Size
- How Long Ice Lasts in a Cooler and How to Extend It
- How to Pack a Cooler for Camping and Keep Food Dry
- Powering a 12V Fridge: Budgeting Battery and Solar
- Mounting, Ventilation and Food Safety on the Trail
- Plan Your Overlanding Cooler Setup Before the Next Trip
- Frequently Asked Questions
What a Complete Overlanding Cooler Setup Includes
A complete overlanding cooler setup is more than a single box of ice. It combines a hard-sided cooler, an interior organizer such as a stainless steel rack, a cold-storage plan, and a power source if you run a 12V fridge. This guide walks through how each part fits together on a trip where the nearest grocery store may be hours away.
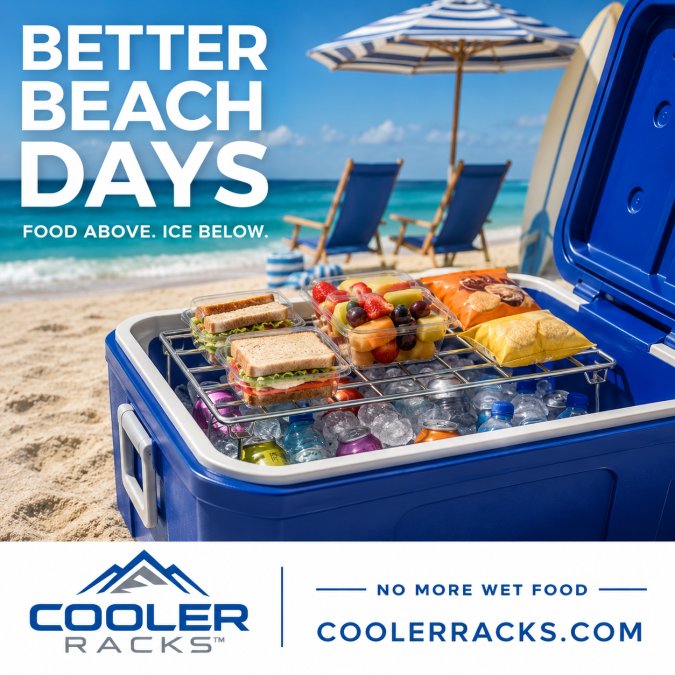
A hard-sided cooler sized to the group and trip length can be paired with an interior rack that keeps food above meltwater. The rack handles organization and keeps sandwiches, produce, and containers dry.
Watch out: Check the interior dimensions before you commit to a setup.
Hard-Sided vs Soft-Sided Cooler: Which Holds Up Off-Road
Cooler Racks™ are designed for hard-sided coolers only.
Sizing Your Cooler by Trip Length and Group Size
Size the cooler to the trip, not to the vehicle. A two-person weekend needs far less capacity than a family of four spending a week away from resupply.
Measure the interior before you buy. Cooler Racks™ come in two sizes: the CR-SS-10 (10 x 11 x 7 inches) and the CR-SS-15 (15 x 11 x 7 inches). You can use one rack or combine both to organize a larger cooler. Our Full Cooler System (25″) pairs both sizes for an end-to-end arrangement in a cooler with at least 25 inches of interior length, 11 inches of interior width, and 7 inches of usable interior height, and sells for $59.99, with standard shipping at $10. Pack a trip with the full cooler system to organize food and keep it dry. For a larger cooler, the Maximum Coverage Cooler Rack System (30″) gives you two full-size racks for an end-to-end arrangement in a cooler with at least 30 inches of interior length, 11 inches of interior width, and 7 inches of usable interior height, for $64.99.

| Setup | Interior Length | Best For | Price (USD) |
|---|---|---|---|
| CR-SS-10 Compact Rack | 10 in | Small cooler, solo or couple | $29.99 |
| CR-SS-15 Full Size Rack | 15 in | Mid-size cooler, weekend trips | $34.99 |
| Double Setup (20 in) | 20 in | Two compact racks in one cooler | $54.99 |
| Full Cooler System (25 in) | 25 in | Compact plus full-size, family use | $59.99 |
| Maximum Coverage (30 in) | 30 in | Group trips, two full-size racks | $64.99 |
Each rack needs 7 inches of usable interior height, so check that dimension as well as length and width.
How Long Ice Lasts in a Cooler and How to Extend It
Ice duration depends on the cooler, ice type, ambient temperature, and how often the lid opens.
Cooler Racks™ support a block-ice setup for what we call Fridge Mode™: organized food storage above the ice, without electricity. Actual cooling time varies with conditions, so treat any duration as an estimate and check food temperatures on longer trips.
How to Pack a Cooler for Camping and Keep Food Dry
Pack in the order you will need items. Set the rack in place, then load sandwiches, produce, and containers on top.
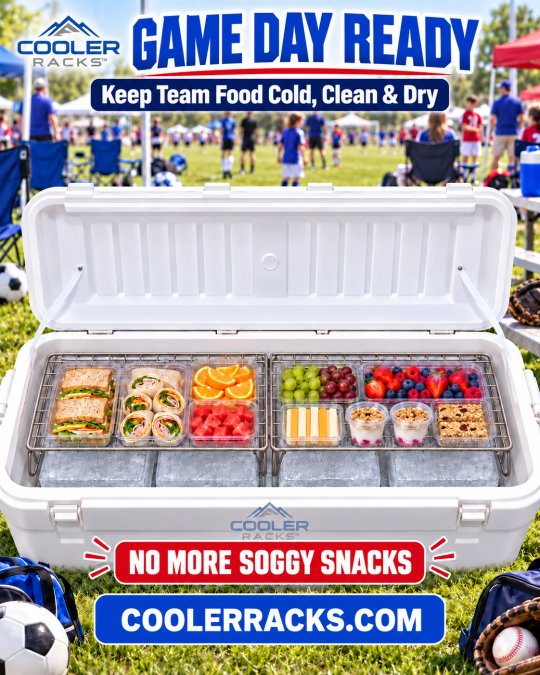
Using Stainless Steel Racks to Keep Food Above Meltwater
The rack's job is to lift food 7 inches above the cold water at the bottom. Its 2 x 2-inch grid lets loose ice pass through while the food stays dry. The 304 food-grade stainless steel is rust-resistant and dishwasher-safe. Folding legs make the rack easy to store between trips.
Powering a 12V Fridge: Budgeting Battery and Solar
A 12V fridge/freezer is the most capable cooler option for overlanding, but it only works if you budget power before you leave the pavement. Unlike an ice cooler, a powered unit runs continuously and its draw changes with ambient temperature, how often the lid opens, and how full it is. The goal is to size your battery and charging so the compressor can run through the hottest part of the day and still leave enough reserve to start the vehicle in the morning.
Start With the Compressor's Real Draw
A simple planning formula:
For example, a fridge drawing 5 running amps at a 33% duty cycle uses about 40 amp-hours per day. A 100 amp-hour lithium battery with 80% usable capacity gives about 80 usable amp-hours, roughly two days of fridge runtime with no charging input. A 100 amp-hour lead-acid battery at 50% depth of discharge gives about 50 usable amp-hours, a little over one day. Those numbers are planning estimates, not guarantees; verify against your own unit's published consumption.
How Ambient Temperature and Duty Cycle Change the Math
Heat is the biggest variable. A fridge set to 37°F in 70°F ambient may hold a low duty cycle; the same fridge in 100°F ambient with the lid opened every meal can nearly double its daily consumption. Park in shade, ventilate the compressor area, and pre-chill food and drinks at home so the unit is not fighting warm contents on day one. Keeping the fridge full, with water bottles or a dedicated ice pack, also stabilizes temperature and reduces compressor cycling. For more on keeping meat cold on the trail, read the step-by-step guide to keeping meat cold while camping.
Solar and Vehicle Charging: Offsetting Consumption
Vehicle charging helps while driving. A DC-to-DC charger (often 20-40 amps) can replenish a battery during travel far faster than a small solar panel, but it only works when the engine is running. The practical pattern for most overlanders is a combination: drive most days to charge, carry solar for base camps, and keep a jump-start pack or a way to isolate the fridge battery from the starting battery.
Pairing a Powered Fridge With an Ice Cooler
battery and charger sizing guidance
Mounting, Ventilation and Food Safety on the Trail
A cooler setup that works in a parking lot can fail on washboard roads, steep descents, and 100°F afternoons. Mounting, airflow, and food handling are where overlanding setups earn their keep, and where generic camping advice usually stops short.
Crash-Safe Mounting and Tie-Down
For 12V fridges, use the manufacturer's mounting brackets or a dedicated fridge slide. A slide makes access easier while parked and keeps the unit from shifting, but confirm the slide's latch is rated for the fridge's loaded weight. Avoid mounting a fridge on a roof rack unless the unit is designed for it, heat and vibration up high shorten compressor life and make access awkward.
Ventilation for Powered Units
For ice coolers, ventilation matters less, but placement still does. Keep the cooler out of direct sun and off hot metal surfaces. A reflective cover or a light-colored cooler helps; a black cooler lid in full sun absorbs heat and shortens ice life.
Food Safety for Multi-Day Trips
USDA food safety guidance for perishables
Plan Your Overlanding Cooler Setup Before the Next Trip
Start by measuring your cooler and choosing a rack size. Cooler Racks™ make the organizer piece simple: elevated food, cold drinks below, and no more soggy sandwiches.
Frequently Asked Questions
What is the best cooler setup for overlanding?
A hard-sided cooler sized to your trip length can be paired with a stainless steel rack to keep sandwiches and produce above meltwater.
Is a hard-sided or soft-sided cooler better for overlanding?
Cooler Racks stainless steel organizers are designed for hard-sided coolers only.
How long does ice last in a cooler on an overlanding trip?
Actual cooling duration depends on the cooler, ice, weather, and use.
How do you keep food dry in a cooler with ice?
Elevate food above the ice and meltwater rather than burying it. A folding stainless steel rack with a 2 x 2-inch grid lets loose ice pass through while keeping sandwiches, produce and food containers dry.
How much ice should you pack for an overlanding trip?
A common starting point is roughly two parts ice to one part food and drinks by volume, though this varies with trip length and climate. Block ice should make up most of the ice load because it lasts longer. Pre-chill the cooler and the drinks before loading, and plan a second ice resupply if the trip exceeds the expected hold time. Verify with a test run before relying on the ratio.
Should you use one large cooler or separate coolers for food and drinks?
Cooler Racks™ racks elevate food above ice and meltwater inside compatible hard-sided coolers.
Is an electric 12V fridge better than a cooler for overlanding?
A 12V fridge/freezer maintains a set temperature without ice and avoids soggy food, but it draws continuous power and needs a battery bank and often solar charging to run off-grid. A quality hard-sided cooler with block ice is cheaper, simpler and has no electrical load. Choose a 12V fridge for extended trips where resupply is limited and power is managed; choose a cooler setup for shorter trips or when simplicity matters most.
How should you organize food in a cooler for a multi-day trip?
Organize by use: pack ready-to-eat items and produce on an elevated rack. Cooler Racks™ racks keep food above ice and meltwater inside compatible hard-sided coolers.
Frequently Asked Questions
Will a stainless steel rack fit a soft-sided cooler? Cooler Racks™ are designed for hard-sided coolers only. Check interior length, width, and at least 7 inches of usable height before buying.
Do I need both rack sizes? One rack works for smaller coolers. Use both sizes together to organize a larger cooler and create two elevated food areas.
