

How to Keep Food Out of Cooler Water?
Last Updated: October 26, 2026
Quick Summary
To keep food out of cooler water, elevate it above the ice using a raised rack or basket system. This creates a dry shelf where food stays protected while ice and meltwater remain below, keeping sandwiches, bread, and perishables fresh and dry throughout your trip.
- Use a stainless steel cooler rack like the CR-SS-10 or CR-SS-15 to provide 7 inches of elevation above ice and meltwater.
- Pack food in sealed containers, freezer bags, or hard containers to protect moisture-sensitive items from absorbing water.
- Place large ice blocks on the cooler floor instead of loose cubes, as they melt slower and create a stable platform.
- Pre-chill your cooler for at least 8 hours before packing to reduce ice melt and meltwater buildup.
- Keep bread, sandwiches, and moisture-sensitive items on the front of the rack away from cooler walls where condensation collects.
Table of Contents
- Why Food Gets Wet in Coolers and How to Prevent It
-
How to Pack a Cooler to Keep Food Dry
- Step 1: Pre-Chill Your Cooler
- Step 2: Build the Bottom Layer With Large Ice
- Step 3: Add an Elevation System Above the Ice
- Step 4: Pack Food in Zones, Not a Pile
- Step 5: Seal Everything That Can Absorb Water
- Step 6: Protect Bread and Other Moisture Magnets
- A Quick Temperature Check
- Pack Tight, But Not Too Tight
- How to Keep Ice Longer in a Cooler
- Using a Cooler Food Organizer to Elevate Your Food
- How to Keep Sandwiches Dry in a Cooler
- Managing Cooler Water and Meltwater Effectively
- Choosing the Right Cooler Setup for Your Trip
- Frequently Asked Questions
Why Food Gets Wet in Coolers and How to Prevent It
Food gets soggy in coolers because ice melts. Meltwater pools at the bottom, and everything sitting in it absorbs moisture: sandwiches turn to mush, bread becomes waterlogged, produce gets slimy.
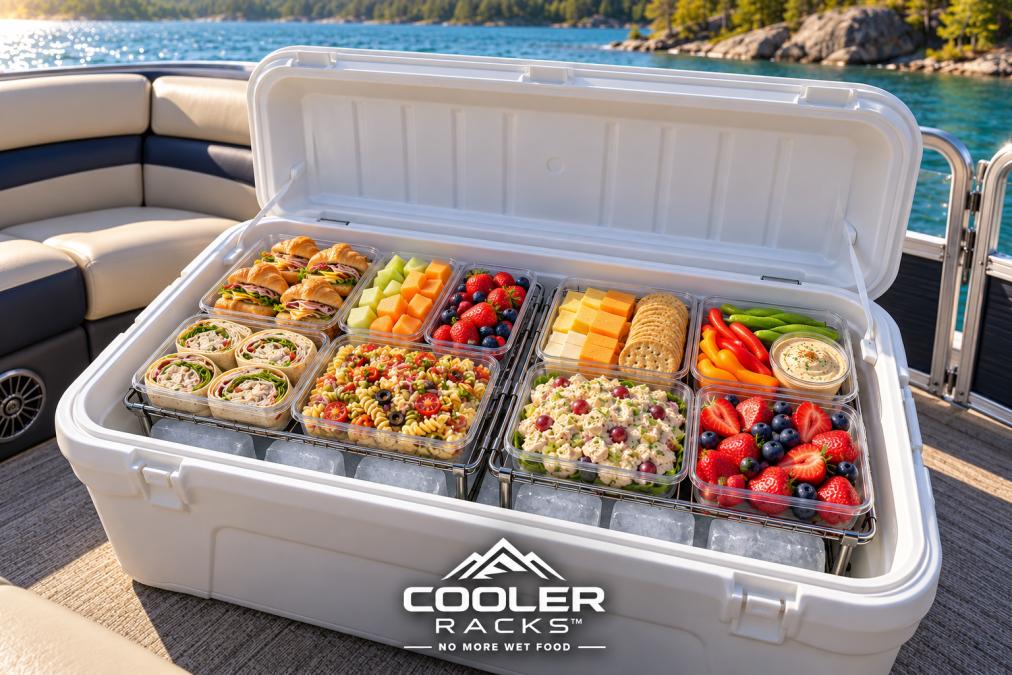
The fix is straightforward: keep food out of cooler water by elevating it above the ice.
When food stays dry, meals taste better and last longer: a sandwich on ice for six hours gets ruined; one on an elevated rack stays fresh.
How to Pack a Cooler to Keep Food Dry
Packing order determines whether your food stays dry or ends up floating in meltwater. This dry-packing method keeps food above the meltwater line, isolates raw meat, and protects moisture-sensitive items.
Step 1: Pre-Chill Your Cooler
Start with a cold cooler, not a room-temperature one. A warm cooler forces ice to work harder, meaning more melting and more water.
Pre-chilling takes 15 minutes of active work and cuts ice melt significantly:
- Fill your cooler with ice the night before your trip
- Leave it sitting overnight or for at least 8 hours
- Empty the melted water before packing food
Step 2: Build the Bottom Layer With Large Ice
Use large ice blocks or frozen water bottles rather than loose ice cubes. Large blocks have less surface area exposed to air, melt slower, and create a stable platform; loose cubes shift and produce more meltwater sooner.
Place the largest blocks flat on the cooler floor. Leave the drain plug closed during transport so meltwater stays contained rather than leaking into your vehicle.
Step 3: Add an Elevation System Above the Ice
An elevation system is the single most direct way to keep food out of cooler water. Learn the best way to organize cooler food with a step-by-step guide to packing strategy. It creates a dry shelf above the ice, like a refrigerator shelf.
A stainless steel cooler rack works well because it does not rust, is food-safe, and holds up to years of use. The CR-SS-10 Compact Cooler Rack (10″) and CR-SS-15 Full Size Cooler Rack (15″) provide 7 inches of elevation, enough room for ice and drinks below while keeping food above the waterline.


Step 4: Pack Food in Zones, Not a Pile
A dry-packing layout separates food by moisture risk and raw-meat risk. Build it in this order, from the bottom of the rack upward:
- Below the rack: drinks, frozen water bottles, and the ice itself. Drinks can sit directly on ice because they are already sealed.
- Rack, back corner: raw meat, poultry, and seafood in a sealed, leak-proof container. Keep this container isolated from everything else and place it where it will not tip.
- Rack, center: dairy, deli items, and cooked proteins in watertight containers.
This zone system keeps moisture-sensitive food away from meltwater and keeps raw meat juices from dripping onto ready-to-eat food, a food-safety issue, not just a soggy-sandwich issue.
Step 5: Seal Everything That Can Absorb Water
Loose food absorbs meltwater like a sponge. Sealed containers protect everything inside.
Pack food in watertight plastic containers with locking lids, sealed freezer bags (thicker and more puncture-resistant than storage bags), waterproof food storage boxes, or insulated lunch bags inside the cooler. For items that can't go in containers, like fresh produce or cheese, use a sealed plastic bag.
Step 6: Protect Bread and Other Moisture Magnets
Bread, tortillas, crackers, and baked goods absorb moisture from the air inside the cooler as well as from liquid water. Even on a rack, they soften if packed next to wet items or against a condensation-covered wall.
- Keep bread in a hard container or a sealed bag with as much air pressed out as possible.
- Do not store bread directly against the cooler wall, where condensation collects.
- If you have room, pack bread in a separate small cooler or a sealed bin at the top of the main cooler.
A Quick Temperature Check
Dry packing is not only about texture. Keep perishable food at or below 40°F and use a cooler thermometer to check.
Pack Tight, But Not Too Tight
Empty air space makes ice work harder. Fill gaps with frozen water bottles, crumpled newspaper, or a clean towel, but leave enough room to close the lid without crushing bread or cracking containers.
How to Keep Ice Longer in a Cooler
Ice melts because it absorbs heat from the environment. Slowing that process keeps your cooler cold longer, meaning less meltwater and less soggy food.
These strategies extend ice life depending on conditions:
- Pre-chill the cooler before packing (as covered above)
- Use large ice blocks instead of loose cubes, they have less surface area exposed to air
- Freeze water bottles and use them as ice, they melt slower and provide drinking water as they thaw
Insulation quality matters too: a thick-walled cooler keeps ice longer than a thin one, so a high-quality cooler pays off for regular multi-day trips.
Using a Cooler Food Organizer to Elevate Your Food
A cooler food organizer is the most direct solution to keeping food out of cooler water. It creates a dry shelf above the ice, just like a refrigerator shelf. Everything on the rack stays dry. Everything below stays cold.
CR-SS-10 Compact Cooler Rack (10″) →
The best cooler organizers are stainless steel: they don't rust, they're food-safe, and they're durable for years.
A cooler rack transforms how you pack:
- Food sits on the rack, completely dry
- Ice and drinks go below the rack
- You fit more in the same cooler because everything is organized
For larger coolers or longer trips, combine both sizes. The Full Cooler System (25″) pairs the compact and full-size racks to give you two separate food zones, which works especially well for families or groups keeping snacks separate from meals.
How to Keep Sandwiches Dry in a Cooler
Sandwiches are the first thing to get soggy because bread absorbs water instantly; one sitting in meltwater for two hours becomes inedible.
Start with these steps:
- Make sandwiches the morning of your trip, not the night before
- Wrap each sandwich individually in plastic wrap or a sealed bag
- Place wrapped sandwiches on an elevated rack, not directly on ice
For a full day, consider making sandwiches on-site: bring pre-portioned ingredients in sealed containers and assemble when ready to eat. The same rule applies to wraps and rolls: elevation and sealing.
Managing Cooler Water and Meltwater Effectively
Meltwater accumulates no matter what you do. What to do with it depends on your cooler type, trip length, and how often you open the lid. Choose a water-management strategy deliberately.
Option 1: Keep the Drain Closed and Elevate the Food
This is the simplest strategy and often the best for day trips and short outings. Leave the drain plug closed and let meltwater collect at the bottom, where it actually helps: water is a better thermal conductor than air, and cold meltwater keeps the lower zone cold. Your food stays dry because it sits on an elevated rack or in sealed containers above the waterline.
- Best for: day trips, short outings, coolers with a good rack or basket.
- Trade-off: water can splash when the cooler is moved, so sealed containers still matter.
- Watch for: water rising high enough to touch the bottom of your rack or containers.
Option 2: Drain Periodically
If your cooler has a drain plug, you can open it every 4-6 hours on warm days to let water out, then close it immediately to keep warm air from entering. Draining reduces weight and keeps the bottom of the cooler from becoming a shallow pool.
- Best for: multi-day trips, large coolers that get heavy, and situations where water is reaching your food zone.
- Trade-off: draining removes cold water that was helping hold temperature, and every drain opening lets warm air in. Drain quickly and close the plug right away.
- Do not leave the drain open during transport unless your cooler is designed for it; you will drip meltwater into your vehicle.
Option 3: Use a Raised Basket or Rack
A raised basket or rack is not just an organizer; it is a water-management tool. It physically separates food from the bottom of the cooler, so even standing water stays below the food, the most reliable way to keep food out of cooler water without constantly draining.
- Best for: almost every setup, especially family coolers where people dig around.
- Trade-off: it takes up vertical space, so pack accordingly.
- Pair with: sealed containers for anything that can absorb moisture.
Option 4: Absorb Standing Water
If your cooler has no drain, or you do not want to open it, absorbent materials can soak up standing water. A clean towel, a dedicated cooler absorbent pad, or even a folded microfiber cloth at the low corner will capture water before it reaches food.
- Best for: soft coolers without drains and short trips.
- Trade-off: absorbent materials take up space and must be wrung out or replaced on longer trips.
- Watch for: a soaked towel sitting against food can transfer moisture, so keep it below the rack.
Match the Strategy to the Trip
- Day trip (under 8 hours): keep the drain closed, use a rack or sealed containers, and do not bother draining unless water reaches the food zone.
- Overnight (24-48 hours): keep the drain closed during transport, drain once at camp if water is high, and rely on a rack plus sealed containers.
- Multi-day (3+ days): drain daily, use large ice blocks to slow melt, and keep a rack system so food stays dry between drains.
Cooler Type Changes the Answer
- Hard-sided coolers usually have a drain plug and a flat floor, so draining and rack systems work well.
- Soft coolers often have no drain, so absorbent materials and sealed containers matter more.
- Coolers with internal trays or baskets already elevate food; add sealed bags for moisture-sensitive items.
The water that collects is not wasted. As frozen water bottles thaw, they become drinking water. As ice melts, it cools the cooler. The goal is to keep that water away from your food, not to remove every drop.
Choose a water-management strategy based on your trip length and cooler type.
| Strategy | Best For | Key Advantage |
|---|---|---|
| Keep drain closed, elevate food | Day trips, short outings | Simplest method, cold water aids cooling |
| Drain periodically every 4-6 hours | Multi-day trips, large coolers | Reduces weight, prevents pooling |
| Use raised basket or rack | Almost every setup | Most reliable way to separate food from water |
| Absorb standing water with towel | Soft coolers without drains | Works without opening cooler |
Choosing the Right Cooler Setup for Your Trip
Different trips need different setups.
Day trips (under 8 hours):
- A basic cooler with ice works fine
- Focus on packing tightly to minimize air space
- Sealed containers for food
Overnight trips (24-48 hours):
- Pre-chill your cooler
- Use large ice blocks instead of loose ice
- Add an elevation system to keep food organized and dry
Multi-day trips (3+ days):
- Invest in a high-quality cooler with thick insulation
- Use a cooler rack system to maximize space and organization
- Consider the Maximum Coverage Cooler Rack System (30″) if you have a large cooler
The trip length determines how much effort the setup needs. A cooler rack makes sense for any trip where you want organized, dry food, and it's especially valuable for families and groups digging through ice.
Frequently Asked Questions
How do you keep food out of cooler water?
The most effective way to keep food out of cooler water is to elevate it above the ice using a cooler food organizer or by creating a physical barrier. Pre-chill your cooler, place ice on the bottom, then set food on a raised platform or in sealed containers above the ice layer. Use watertight bags for items prone to soaking, keep the cooler drain closed, and manage meltwater by monitoring levels during your trip. A stainless steel cooler rack provides reliable 7-inch elevation and prevents direct contact with meltwater.
Should food go above or below ice in a cooler?
Food should always go above ice in a cooler. Placing food directly on ice or allowing it to sink into meltwater causes soggy bread, waterlogged vegetables, and compromised perishables. Ice belongs at the bottom of your cooler to act as a cooling source. Drinks can sit directly on ice or in meltwater since they're sealed. By keeping food elevated on a platform or organizer, you maintain food quality.
What is the best way to pack a cooler to keep food dry?
Pack your cooler in layers: start with pre-chilled ice at the bottom, add a cooler rack or organizer to elevate food 7 inches above the ice, then arrange food on top in sealed containers or watertight bags. Keep boxed foods like bread and cereals on the upper rack away from moisture. Place perishables like meat and eggs in sealed plastic bags before setting them on the rack. Drinks go below the rack where they can sit on ice. Keep the cooler drain closed to prevent meltwater from draining, and monitor water levels every few hours on longer trips.
How long can food stay safe in a cooler without power?
With ice, pre-chilling, and proper packing, you can extend how long food stays safe depending on outside temperature, cooler quality, and ice volume. For trips longer than one day, use large ice blocks or frozen water bottles that melt slower than crushed ice, and avoid opening the cooler frequently. A cooler rack helps maintain consistent cold air circulation by keeping food elevated.
Keeping food dry in a cooler isn't complicated, but it does require intentional setup. Pre-chill, elevate your food above ice, use sealed containers, and manage meltwater. These steps work together to eliminate soggy sandwiches and ruined meals. For the most reliable solution, a stainless steel cooler rack keeps everything organized and dry without extra effort. Get started with Cooler Racks™ and transform how you pack for your next trip.
