

Using Block Ice for Food Storage: A Complete Guide
Table of Contents
- Why Block Ice Works Better for Food Storage
- Block Ice vs. Ice Packs for Coolers: Which Keeps Food Colder Longer
- How Long Does Ice Last in a Cooler
- Calculating the Right Cooler Ice-to-Food Ratio
- How to Keep Food Dry in a Cooler with Block Ice
- Step-by-Step: Packing Your Cooler with Block Ice
- Common Mistakes to Avoid When Using Block Ice
- Frequently Asked Questions
Last Updated: October 12, 2026
Why Block Ice Works Better for Food Storage
Using block ice for food storage keeps food colder longer than cubed or loose ice. The reason is simple: block ice has less surface area exposed to air, so it melts more slowly. When ice melts slowly, your cooler stays cold for more hours.
Think about it this way. Cubed ice has many small surfaces touching warm air. Each cube melts independently. Block ice is one solid mass. Only the outside melts, protecting the ice core inside.
This matters for real trips. A cooler packed with block ice can keep food safe for 3-5 days, depending on the cooler quality, ice quantity, and how often you open it. Loose ice might only last 1-2 days.
At Cooler Racks™, we recommend block ice because it pairs perfectly with proper cooler organization. When you use block ice with a stainless steel cooler rack, you create what we call "Fridge Mode", food stays elevated and dry above the ice, while drinks stay cold below.

The ice mass also transfers cold more evenly through a cooler. Block ice creates cold pockets that keep the entire cooler at safe temperatures longer. You're not just cooling food; you're cooling the entire space around it.
Block Ice vs. Ice Packs for Coolers: Which Keeps Food Colder Longer
Block ice beats reusable ice packs in almost every outdoor scenario. Here's why: block ice is denser and colder than gel-based packs, and it lasts significantly longer.
Ice packs stay cold for 24-48 hours in most conditions. Block ice stays cold for 3-5 days or more. If you're camping or on a road trip longer than two days, block ice is the clear winner.
Ice packs have one advantage: they don't create meltwater. Your food won't get wet. But that's where Cooler Racks™ solves the real problem. With a stainless steel cooler rack, you get block ice's superior cooling power plus the dry-food benefit of ice packs. Food sits elevated above the ice and any meltwater.
Ice packs also take up valuable cooler space. Block ice is compact and fills gaps efficiently. You can pack more food and drinks in the same cooler when you use block ice strategically.
For boating, fishing, and overlanding trips, block ice is non-negotiable. You need cooling that lasts days, not hours. Reusable packs are better for day trips to the beach or short picnics.
How Long Does Ice Last in a Cooler
How long block ice lasts depends on four main factors: cooler quality, ice quantity, outside temperature, and how often you open the cooler.
A high-quality hard-sided cooler with thick insulation can keep block ice frozen for 5-7 days in cool weather. A basic cooler might only preserve it for 2-3 days. The difference is insulation thickness and seal quality.
The amount of ice matters too. A cooler packed 70% ice and 30% food will keep that ice longer than one that's 50/50. More ice mass means more thermal energy to lose before everything melts.
Hot weather accelerates melting. Block ice in a cooler sitting in 90-degree sun lasts much shorter than the same cooler in 60-degree conditions. Shade helps dramatically, a shaded cooler can extend ice life by 24-48 hours.
Opening the cooler frequently is the biggest killer. Every time you lift the lid, warm air rushes in and cold air escapes. A cooler opened 10 times per day will lose ice 2-3 times faster than one opened twice per day.
| Factor | Impact on Ice Duration |
|---|---|
| Cooler insulation | Thick walls = 5-7 days; thin walls = 2-3 days |
| Ice-to-food ratio | 70/30 ratio lasts longer than 50/50 |
| Ambient temperature | Cool weather extends duration by 24-48 hours |
| Cooler opening frequency | Frequent opening cuts duration in half |
| Shade vs. direct sun | Shaded coolers preserve ice 1-2 days longer |
Calculating the Right Cooler Ice-to-Food Ratio
Getting the ice-to-food ratio right is the single biggest factor in how long your cooler stays cold. Too little ice and your food warms up. Too much ice and you waste space.
Start with this formula: multiply your cooler's total capacity by 0.7. That's your ice amount in pounds or liters. The remaining 30% is food and drinks.
Example: A 70-liter cooler needs roughly 49 liters of ice. That leaves 21 liters for food, beverages, and containers.
For trips under 24 hours, a 50/50 split works fine. You don't need maximum cooling duration. For trips 2-5 days, use 60/40 or 70/30.
Block ice is easier to calculate than loose ice. One standard block is usually 5-10 pounds. Count how many blocks fit in your cooler, then fill remaining space with food.
Hard coolers with better insulation can use less ice and still keep food cold. Soft coolers need more ice because they insulate poorly. A soft cooler might need 80/20 ratio to match a hard cooler's 70/30 performance.
How to Keep Food Dry in a Cooler with Block Ice
Meltwater is the enemy of dry food. Block ice melts, water pools at the bottom, and your sandwiches, bread, and produce get soggy. The solution is elevation.
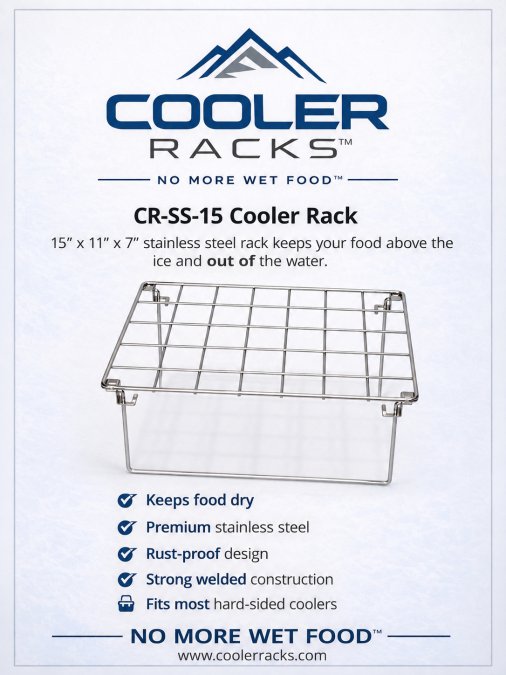
A stainless steel cooler rack lifts food above the water line. This is the foundation of proper cooler organization. Food stays dry. Drinks stay cold below. Meltwater drains away from everything you eat.
Cooler Racks™ racks provide 7 inches of elevation, enough to keep food completely separated from ice and meltwater. The 2x2-inch grid lets loose ice pass through while supporting food containers.
Beyond using a rack, follow these steps:
- Wrap perishable food in plastic containers or bags before placing on the rack
- Use sealed containers for anything that could absorb water
- Place absorbent items like bread or produce in waterproof bags
- Layer paper towels under containers to catch any drips
- Drain meltwater daily if the trip lasts more than 24 hours
Drinks below the rack stay cold without touching ice directly. They sit in the cooler's cold air. This setup mimics a refrigerator, cold storage without direct ice contact.
The grid design of Cooler Racks™ allows cold air to flow under food. This keeps the entire rack area at safe temperatures. You're not just protecting food from water; you're maintaining consistent cooling across all your provisions.
Step-by-Step: Packing Your Cooler with Block Ice
Step 1: Prepare Your Cooler and Block Ice
Start with a clean cooler. Rinse the inside with water to remove dust and debris. A clean cooler cools faster and keeps food safer.
CR-SS-15 Full Size Cooler Rack (15″) →
Pre-chill your cooler if possible. Leave it in a cool place for 2-4 hours before packing. A pre-chilled cooler extends ice life significantly.
Prepare your block ice. If making ice at home, freeze it in large molds 24 hours ahead. If buying block ice, keep it in a freezer until you pack the cooler.
Gather your Cooler Racks™. Check the size guide at www.coolerracks.com to confirm fit.
Step 2: Create Your Foundation Layer
Place block ice directly on the cooler bottom. Use one large block or arrange multiple smaller blocks to cover the floor. The goal is solid ice coverage.
If using loose ice to fill gaps, pack it around the block ice. The block ice is your primary cooling mass; loose ice fills spaces and accelerates cooling.
Position your Cooler Racks™ on top of the ice. The folding legs rest on the ice surface. The rack should sit level and stable. The 7-inch elevation creates a clear separation between ice below and food above.
Step 3: Arrange Food and Beverages
Place food containers on top of the rack. Heavy items go in the center for stability. Lighter items go toward the edges.
Drinks go below the rack, nestled around the block ice. Beverages chill quickly in this setup and don't need the rack's elevation, they're safe touching cold air around the ice.
Use sealed containers for raw meat, fish, or anything that could drip. Place these containers away from ready-to-eat food. This prevents cross-contamination.
Organize by meal order. Items you'll need first go toward the front. Items for later go toward the back. This minimizes cooler opening time.
Step 4: Monitor Temperature and Drainage
Check cooler temperature after 2-3 hours. It should feel cold to the touch. If it's warm, you didn't use enough ice.
Drain meltwater daily for trips longer than 24 hours. Open the cooler's drain plug or carefully tilt the cooler to pour water out. Meltwater buildup reduces cooling efficiency.
If using multiple racks, check that cold air flows between them. The grid design allows air circulation. Make sure food containers don't block airflow.
On trips longer than 3 days, replace block ice if it's melted more than halfway. Fresh ice restores cooling power.
Common Mistakes to Avoid When Using Block Ice
Using too little ice. Many people underestimate how much ice they need. A cooler that's only 30% ice warms up fast.
Packing warm food directly on ice. Hot or room-temperature food melts ice rapidly. Pre-chill all food and drinks before packing.
Opening the cooler constantly. Every lid opening lets cold air escape. Plan what you need before opening. Close the lid immediately after.
Mixing ice types inefficiently. Combining block ice with loose ice is fine, but don't use only loose ice for long trips.
Ignoring meltwater buildup. Water that pools at the bottom reduces cooling and makes food soggy. Drain the cooler every 24 hours.
Not pre-chilling the cooler. A warm cooler melts ice faster than a cold one. Spend 2-4 hours pre-chilling before packing.
Choosing the wrong cooler size. A cooler that's too small forces you to pack it densely, reducing ice effectiveness.
Forgetting about insulation quality. A cheap cooler with thin walls won't keep ice frozen as long as a quality cooler.
Using block ice for food storage transforms how you pack a cooler.
The key is understanding that ice retention, food placement, and meltwater management work together. Block ice provides the cooling power.
Ready to eliminate wet food and organize your cooler like a fridge? For larger coolers, our Full Cooler System bundle gives you maximum coverage at a better price.

Frequently Asked Questions
How long does block ice last in a cooler compared to cubed ice?
Block ice typically lasts 5-7 days in a well-insulated cooler, while cubed or loose ice melts in 1-3 days. The difference comes down to surface area: block ice has less exposed surface, so it melts more slowly. In a cooler with proper insulation and minimal opening, block ice can maintain cold temperatures for a week or longer, making it ideal for camping trips, fishing expeditions, and multi-day road trips.
Should food touch block ice directly, or should I keep them separated?
Food should never touch block ice directly. Direct contact freezes food, damages texture, and creates safety issues. Instead, use a cooler rack or elevation system to keep food 7 inches above the ice. This approach maintains proper food-safe temperatures (below 40°F for perishables) while preventing freezer burn and soggy packaging. A stainless steel cooler rack creates an organized shelf that holds food safely above ice and meltwater.
How much block ice do I need for my cooler?
How much block ice you need depends on ambient temperature, cooler insulation, how often you open it, and your trip length. For hot weather or longer trips, you may need more ice. For short day trips in mild weather, you may need less.
How do I keep perishable food at a safe temperature in a cooler with block ice?
Keep perishables at 40°F or below by placing them on an elevated rack above block ice, never in direct contact. Use a food thermometer to check temperatures, especially on longer trips. Pack perishables in airtight containers to prevent cross-contamination from meltwater. Store raw meat on the lowest shelf above ice, away from ready-to-eat foods. Replace or add ice as needed to maintain cold temperatures, and limit cooler opening to reduce warm air exposure.