

Best Portable Coolers for Long Road Trips and Dry Food
Last Updated: November 4, 2026
Quick Summary
The best portable coolers for long road trips match ice retention, interior dimensions, and weight-to-volume ratio to how you travel, and packing strategy often decides whether food stays cold and dry. Layer block ice on the bottom, elevate food on a rack above the meltwater, and keep perishables at or below 40°F.
- Block ice is the recommended ice format for the Fridge Mode setup.
- A rack elevates food seven inches above ice and water on a 2x2-inch grid.
- Perishable food held above 40°F for more than two hours should be discarded.
- Measure cargo opening height and width, not just trunk floor dimensions.
- Every rack setup needs at least 11 inches of interior width and 7 inches of height.
Table of Contents
- What Actually Matters in Portable Coolers for Long Road Trips
- Cooler Packing Strategies That Stretch Ice Through Multi-Day Drives
- How to Keep Food Dry in a Cooler Without Digging Through Meltwater
- Food Safety in Coolers: Temperature Rules for the Road
- Vehicle Fitment and Power Draw for Electric Coolers
- Cooler Rack Setups Compared: Which Configuration Fits Your Cooler
- Measure Your Cooler and Pick the Rack Setup That Fits
- Frequently Asked Questions
What Actually Matters in Portable Coolers for Long Road Trips
Most road trip cooler advice starts with brand names. That's backwards. The best portable coolers for long road trips match ice retention, interior dimensions, and weight-to-volume ratio to how you actually travel.
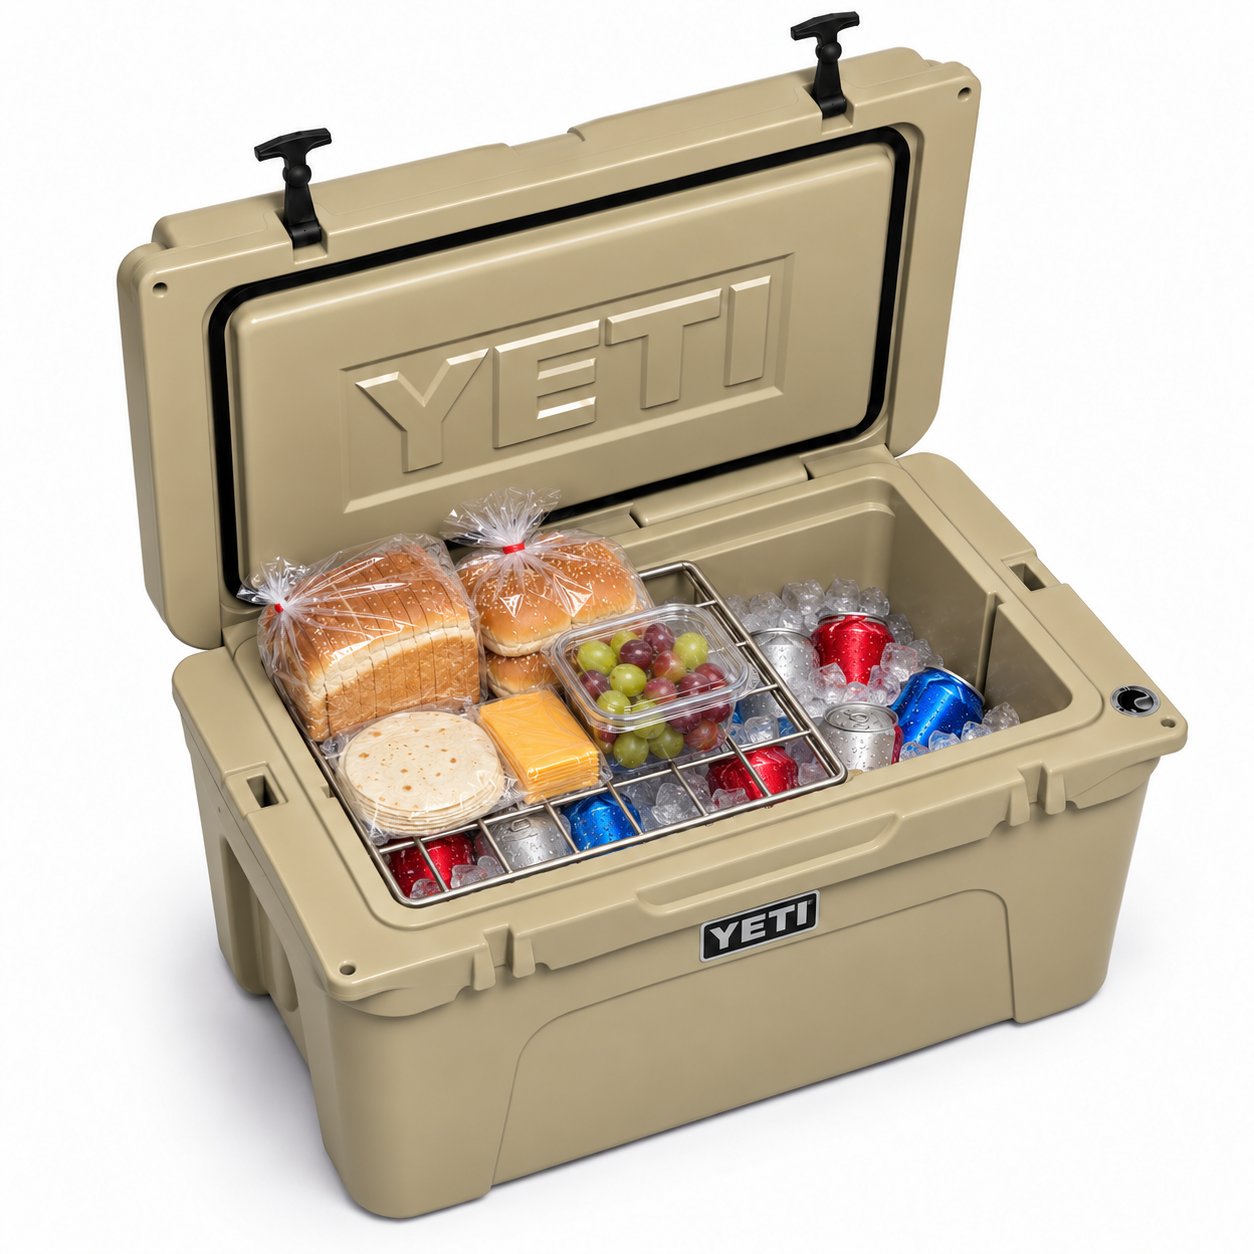
Two things decide whether your food survives a four-day drive: how well the cooler holds cold, and whether your food stays out of the meltwater that cold produces. Get the second wrong and a great cooler still hands you soggy sandwiches by day two.
Ice Retention and Thermal Insulation
Ice retention is how long a cooler keeps ice frozen, measured in days under given conditions. A compressor-driven electric cooler sidesteps ice entirely, at the cost of a 12V supply and planned power draw. Pre-chilling any cooler is the cheapest ice-retention upgrade available.
Interior Fit, Quart Volume, and Weight-to-Volume Ratio
Quart volume tells you capacity; exterior dimensions tell you whether the cooler fits behind a seat or in a truck bed with the tonneau closed. Those are not the same number, and the gap is the weight-to-volume ratio problem. A large rotomolded cooler can weigh more empty than a smaller one weighs full. Measure your vehicle's cargo space before you shop, then measure the cooler's interior separately, because interior organization determines whether you can reach the food.
Cooler Packing Strategies That Stretch Ice Through Multi-Day Drives
Cold air sinks and meltwater pools at the bottom, so the packing order is fixed: block ice or frozen bottles on the floor, drinks around them, food elevated above the waterline.
Layer in this order and you buy yourself extra days:
- Block ice or frozen water bottles flat on the bottom
- Drinks and items you won't touch until evening, packed around the ice
- A rack or shelf creating a dry platform above the ice line
Open the lid less. For a deeper breakdown of layering and ice strategy on multi-day drives, see our guide on how to pack a cooler for road trip trips.
How to Keep Food Dry in a Cooler Without Digging Through Meltwater
Keeping food dry in a cooler means physically separating it from the meltwater that collects at the bottom.
This is the problem our folding 304 food-grade stainless steel racks were built for. A rack elevates food seven inches above the ice and water, with a 2x2-inch grid that lets loose ice pass through.
For a step-by-step method covering separation, drainage, and condensation management, our guide on how to keep food dry in cooler setups walks through it in detail.
Food Safety in Coolers: Temperature Rules for the Road
Food safety in coolers comes down to one number: 40°F. Per USDA Food Safety and Inspection Service guidance on refrigerated storage, perishable food held above 40°F for more than two hours should be discarded.
Drain the cooler daily and top up ice before it fully melts. For a fuller checklist on preventing spoilage over multi-day trips, read our guide on preventing food spoilage in coolers.
Vehicle Fitment and Power Draw for Electric Coolers
Most guides stop at "measure your trunk." That is not enough. A cooler can have plenty of cargo volume and still not fit through the opening, under a tonneau cover, or behind the second row once the seats are up. Fitment is a three-measurement problem, and power draw is a fourth.
The four measurements that decide fitment
Before you shop, measure these on your vehicle with the seats in the position you actually drive with:
- Cargo opening height and width, the smallest gap the cooler must pass through, not the trunk floor dimensions. A hatchback opening is often several inches shorter than the floor behind it.
- Floor length and width, the flat footprint the cooler will sit on. Account for wheel wells and seat brackets that intrude.
- Usable height, floor to the underside of a closed tonneau, cargo cover, or hatch glass. A rotomolded cooler with a lid latch can lose an inch or more to hardware.
Then compare those numbers to the cooler's exterior dimensions, not its quart rating. Two coolers rated at 45 quarts can differ by several inches in length and height. A large rotomolded cooler often fits a truck bed with the tonneau open but not closed, because the lid and latches add height the spec sheet lists separately.
Watch out: measuring only the trunk floor and ignoring the opening height is the most common fitment mistake, the cooler fits the space but not the doorway into it.
A quick fitment check by vehicle type
Use these as starting points, then verify with a tape measure:
- Sedans and coupes, trunk openings are shallow and the pass-through is narrow. Favor soft-sided coolers or compact hard-sided models under roughly 24 inches long, and confirm the lid clears the trunk lip.
- Hatchbacks and small SUVs, the rear opening is taller but the floor is short once the second row is up. Measure floor depth with the seats in your normal driving position.
- Mid-size and full-size SUVs, third-row-up configurations leave a narrow well behind the seats; folding the third row opens a flat floor but removes passenger space. Decide which trade-off you drive with.
Power draw for electric coolers
Electric coolers trade ice for electricity, and the trade only works if you size the draw against your battery and charging setup.
Plan around these variables rather than a single wattage number:
- Average draw versus peak draw, a compressor cooler's startup surge is higher than its running draw, so size fuses and wiring for the peak, not the average.
- Duty cycle, in hot weather a compressor cooler runs a larger share of each hour. A cooler that draws modestly at 70°F can draw far more at 95°F, so plan for the hottest day of the trip, not the mildest.
- Battery capacity and chemistry, a starting battery is not a deep-cycle battery. Running a cooler overnight on the vehicle's starting battery risks a no-start in the morning; a dedicated deep-cycle or lithium house battery is the safer pattern.
A 12V cooler that fits the space but drains your battery overnight is a worse choice than a well-packed hard-sided cooler with block ice.
For the packing side of either setup, see our guide on how to pack a cooler for road trip trips.
Cooler Rack Setups Compared: Which Configuration Fits Your Cooler
Rack configuration depends on three things: your cooler's interior length, how many food zones you need, and whether you want to keep drinks and food physically separated. The table below maps each setup to those needs, but read the selection logic underneath it before you order, the table alone will not tell you which one fits your cooler.
| Setup | Racks Included | Min. Interior Length | Price | Best For |
|---|---|---|---|---|
| CR-SS-10 Compact | One 10"x11"x7" | 10" | $29.99 | Small coolers, solo trips |
| CR-SS-15 Full Size | One 15"x11"x7" | 15" | $34.99 | Standard coolers, families |
| Double Cooler Rack (20") | Two compact racks | 20" | $54.99 | Two food zones, mid-size coolers |
| Full Cooler System (25") | One compact + one full | 25" | $59.99 | Best seller, most hard-sided coolers |
| Maximum Coverage (30") | Two full-size racks | 30" | $64.99 | Large group and boat coolers |
Every setup needs at least 11" of interior width and 7" of usable interior height. For a deeper comparison of rack systems, our guide on cooler storage rack systems covers each configuration.
How to choose between one zone and two
A single rack creates one dry platform above the ice line, enough for a solo traveler or a couple packing sandwiches, produce, and a few containers. Two racks create two separate dry zones, which matters when you want to keep ready-to-eat food away from raw meat, or a dedicated snack zone you can reach without unpacking the whole cooler.
- One zone, simplest, lightest, and the least expensive. Best when all your food can share a platform and you do not need to separate categories.
- Two zones, useful for families, group trips, and anyone packing raw proteins alongside ready-to-eat food. The separation also lets you organize by meal so you are not digging through everything at lunch.
Match the rack to the cooler, not the label
Two coolers with the same quart rating can have very different interior footprints, so choose by usable interior measurements. A 45-quart cooler from one brand may have a longer, shallower interior than a 45-quart cooler from another, and the rack that fits one may not fit the other.
Work through this sequence:
- Measure interior length, width, and usable height with the lid closed.
- Confirm at least 7" of height above the ice line, the rack sits on top of the ice, so that clearance is what keeps food dry.
- Decide whether you need one food zone or two.
- Match interior length to the setup's minimum requirement, with a little margin so the rack does not jam against the walls.
- Check the Size Guide for your specific model before ordering.
Watch out: ordering by cooler capacity instead of interior measurements is the most common fitment mistake, a rack sized to the quart label can be too long or too short for the actual interior.
Maintenance and repairability
A rack is a long-term purchase, so treat it like one. Stainless steel racks can be rinsed and dried after trips, and our racks are dishwasher-safe for a deeper clean. Check the welds and grid spacing periodically; a bent rack will not sit level above the ice line, which defeats the purpose.
When comparing coolers, check whether the manufacturer sells replacement latches and gaskets.
Our compatibility guide confirms whether a rack fits your exact cooler.
Measure Your Cooler and Pick the Rack Setup That Fits
Measure the inside of your cooler first, not the capacity label. Choose by usable interior measurements, never by brand or quart rating alone, because two coolers with the same capacity can have very different interior footprints.
Use this checklist before ordering:
- Measure interior length, width, and usable height
- Confirm at least 7" of height above the ice line
- Decide whether you need one food zone or two
Our compatibility guide confirms whether a rack fits your exact cooler. Watch out: ordering by cooler capacity instead of interior measurements is a common fitment mistake.
Frequently Asked Questions
How long can food safely stay in a portable cooler?
The USDA Food Safety and Inspection Service uses 40°F as the line: perishables held above that for more than two hours should be discarded. In practice, a well-packed hard-sided cooler with block ice holds safe temperatures far longer than a soft bag, but every time you open the lid you lose cold air. Keep a thermometer inside, group drinks separately, and open the cooler as few times as possible on long road trips.
What is the best way to keep food dry inside a cooler?
Separate food from meltwater physically rather than relying on containers alone. An elevated rack, such as the CR-SS-15 Full Size Cooler Rack at $34.99, lifts sandwiches and produce 7 inches above the ice and water.
Are hard-sided or soft-sided coolers better for long drives?
Our racks are designed for hard-sided coolers only, so a hard-sided cooler is the setup they are built for.
How do you prevent cross-contamination in a road trip cooler?
Raw meat goes in its own sealed container at the bottom, below ready-to-eat food, so any leak drips away from sandwiches and produce. Use the rack for cooked and ready-to-eat items, keep drinks in a separate zone, and never reuse a container that held raw protein without washing it. A dishwasher-safe stainless rack makes cleanup easy between trips, and a 2 x 2-inch grid lets loose ice drain through instead of trapping debris against food.
Will a cooler rack fit my older hard-sided cooler?
Measure the inside, not the brand or the stated quart capacity. The CR-SS-10 Compact Cooler Rack needs at least 10 inches of interior length, 11 inches of width, and 7 inches of usable height, while the CR-SS-15 needs 15 inches of length. Our racks are verified to fit 86 cooler models, so check the Size Guide for your model before ordering. If your cooler is soft-sided, the rack is not designed for it, since the flexible walls will not support a level platform.
Your cooler only works as hard as your packing strategy lets it. If you're tired of soggy sandwiches and cold, wet hands every time you open the lid, Cooler Racks™ gives you a stainless steel platform that keeps food dry above the ice and drinks cold below. Our racks are rust-resistant, dishwasher-safe, and built to fit most hard-sided coolers. Get started with Cooler Racks™ and pack your next road trip with No More Wet Food™.
