

Best Way to Pack a Cooler for Camping
Table of Contents
- Why Cooler Packing Strategy Matters for Camping
- Choosing the Right Cooler Size and Type
- How to Keep Food Dry in a Cooler
- Where to Put Ice Packs in a Cooler
- How to Keep Food Cold for 3 Days While Camping
- Camping Cooler Packing List and Organization
- Common Mistakes and How to Avoid Them
- Frequently Asked Questions
Last Updated: October 5, 2026
Why Cooler Packing Strategy Matters for Camping
A poorly packed cooler turns your camping trip into a soggy disappointment. Food gets waterlogged, drinks warm up faster than expected, and you're left digging through melted ice to find anything edible. The best way to pack a cooler for camping isn't complicated, but it does require intentional setup.
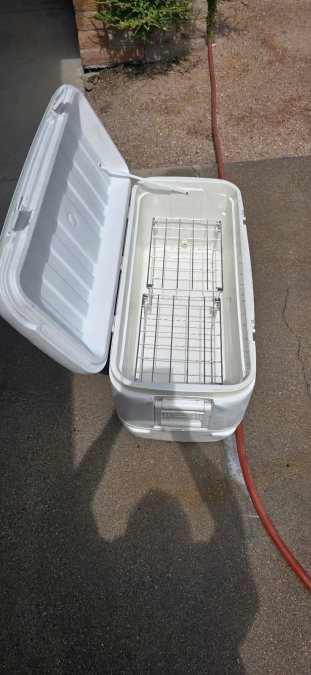
The difference between a cooler that keeps food fresh for three days and one that fails after 12 hours comes down to strategy: choosing the right cooler size, pre-chilling everything, layering food and ice correctly, and keeping perishable items separated from meltwater.
This guide walks you through the exact steps to pack a cooler for camping trips of any length. We'll cover cooler selection, ice management, food organization, and the most common mistakes that sabotage your setup. By the end, you'll have a system that keeps your sandwiches dry, your drinks cold, and your camping meals safe to eat.
Choosing the Right Cooler Size and Type
The first decision is picking a cooler that matches your trip length and group size. A cooler that's too small forces you to choose between ice and food. One that's too large wastes space and reduces cooling efficiency because there's more air to chill.
For camping trips, hard-sided coolers outperform soft coolers because they retain cold better and provide a rigid structure for organizing layers. Soft coolers collapse as items shift, making it harder to maintain separation between food and ice.
Size guidelines depend on your group:
- Solo camper or couple: 25-35 quart cooler
- Family of four: 50-70 quart cooler
- Large group or week-long trip: 70+ quart cooler
The cooler's interior dimensions matter more than the quart rating. You need at least 15 inches of length, 11 inches of width, and 7 inches of usable height to fit a proper layering system that keeps food dry and organized.
How to Keep Food Dry in a Cooler
The enemy of dry food in a cooler is meltwater. As ice melts, it pools at the bottom, turning sandwiches into soggy mush and creating cross-contamination risks.
A cooler rack creates a physical barrier between perishable food and melted ice. The best way to pack a cooler for camping uses this two-level system: ice and drinks underneath, food containers and items on top.
When setting up your cooler rack, position it so there's at least 7 inches of clearance between the bottom of the cooler and the top of the rack. This gives ice room to melt and circulate cold air underneath without touching your food.
The 2x2-inch grid pattern on quality cooler racks allows loose ice and cold air to pass through freely while supporting food containers securely. Avoid makeshift solutions like stacking coolers or using loose boards, which trap water and create unstable surfaces.
Where to Put Ice Packs in a Cooler
Ice placement determines how long your cooler stays cold and how effectively it protects food. The best way to pack a cooler for camping prioritizes ice at the bottom and along the sides, with frozen water bottles and gel packs supporting the food layer above.
Start with a solid foundation of block ice on the cooler bottom. Block ice lasts significantly longer than ice cubes because it has less surface area exposed to air.
Layer your ice strategically:
- Bottom layer: 2-3 inches of block ice or large ice chunks
- Sides: Additional ice or frozen gel packs along the cooler walls
- Top layer: Frozen water bottles or gel packs resting on the cooler rack above your food
Frozen water bottles serve double duty: they keep food cold and provide drinking water as they melt. This is more efficient than carrying separate drinking water and ice. Fill bottles three-quarters full before freezing to allow expansion without bursting.
Gel packs work well for supplementary cooling but don't match block ice's longevity. Use them to fill gaps around the sides and provide extra cooling capacity for the first 24 hours.
How to Keep Food Cold for 3 Days While Camping
Three-day camping trips require deliberate planning to maintain food safety and prevent spoilage. The best way to pack a cooler for camping on multi-day trips combines proper ice selection, pre-chilling, and strategic food organization.
Pre-chill your cooler 24 hours before packing. Fill it with ice and leave it in a shaded location overnight. A cold cooler maintains temperature far longer than one at room temperature.
Pre-chill all food and drinks before packing. Warm items force your cooler to work harder and melt ice faster.
For three-day trips, use the layering approach:
- Day 1 items: Easily accessible on top
- Day 2-3 items: Stored lower and toward the back
- Raw meat: Sealed in a separate container at the bottom to prevent cross-contamination
Limit cooler opening. Each time you open it, cold air escapes and warm air enters. Organize items so you can grab what you need without prolonged searching.
Monitor cooler temperature by checking ice levels daily. If ice is melting faster than expected, you're opening the cooler too frequently or the ambient temperature is unusually high.
CR-SS-15 Full Size Cooler Rack (15″) →
Camping Cooler Packing List and Organization
Proper organization separates a functional cooler from a chaotic mess. This packing approach keeps everything accessible, prevents cross-contamination, and maximizes cooling efficiency.
Pre-Packing Checklist:
- Measure cooler interior dimensions (length × width × height)
- Select appropriate cooler rack size (CR-SS-10 for compact setups, CR-SS-15 for full-size coolers)
- Freeze water bottles 24 hours before trip
- Pre-chill cooler overnight with ice
- Purchase block ice (5-10 pounds for 3-day trip)
- Prepare gel packs in freezer
- Refrigerate all food and drinks overnight
Packing Order (layer by layer):
- Bottom layer (ice foundation): 2-3 inches of block ice or large ice chunks
- Side walls: Frozen gel packs and additional ice along cooler edges
- Cooler rack placement: Position rack on top of ice layer, ensuring 7 inches of clearance
-
Food organization on rack:
- Back section: Raw meat in sealed containers
- Middle section: Dairy, cheese, lunch meats in airtight containers
- Front section: Ready-to-eat items, produce, snacks
- Top layer: Frozen water bottles resting on cooler rack
- Final ice layer: Small ice cubes or gel packs filling any gaps above food
| Packing Layer | Contents | Purpose | Duration |
|---|---|---|---|
| Bottom | Block ice (2-3 inches) | Foundation cooling | 3-4 days |
| Sides | Gel packs, ice | Wall insulation | 1-2 days |
| Middle | Cooler rack | Food elevation | Duration of trip |
| Food zone | Organized containers | Dry storage | Duration of trip |
| Top | Frozen water bottles | Supplementary cooling | 2-3 days |
Separate raw meat from ready-to-eat foods using sealed containers. Raw meat should sit lowest, away from other items, to prevent juices from contaminating vegetables, cheese, or prepared foods. Use dedicated containers for raw proteins and clearly label them.
Keep frequently used items (drinks, snacks, condiments) toward the front and top of the cooler. Items you won't need until day two or three go toward the back and bottom. This minimizes cooler opening time and maintains temperature stability.
Drain meltwater every 12-24 hours using the cooler's drain plug. Accumulated water reduces cooling efficiency and creates an environment for bacterial growth. Empty the drain into a designated area away from your campsite.
Common Mistakes and How to Avoid Them
Even experienced campers make predictable packing errors that compromise cooler performance. Recognizing these mistakes helps you avoid them.
Mistake 2: Using only ice cubes. Ice cubes melt three times faster than block ice because they have more surface area.
Mistake 3: Placing ice directly on food. Ice melts into water that pools around food, creating soggy items and cross-contamination risks.
Mistake 4: Overstuffing the cooler. Cramming too much food leaves no room for adequate ice. Cold air needs space to circulate.
Mistake 5: Storing raw meat with ready-to-eat food. Raw meat juices can contaminate vegetables, cheese, and prepared foods if they're stored together.
Mistake 6: Opening the cooler frequently. Each opening allows cold air to escape and warm air to enter, melting ice faster.
Mistake 7: Ignoring drain maintenance. Meltwater accumulation reduces cooling efficiency and creates bacterial growth conditions.
Packing a cooler correctly transforms your camping experience.
Cooler Racks™ makes this system simple. The CR-SS-15 keeps food dry for around 50 to 70 quart coolers, while the Full Cooler System combines two racks for maximum coverage.

Frequently Asked Questions
Do I put ice packs on top or bottom of a cooler?
Ice should go on the bottom and sides of your cooler, not on top of food. When you pack ice at the bottom, cold air naturally rises and surrounds your perishable food and drinks. If you place ice directly on top of food, it melts faster and creates meltwater that soaks everything. Using a cooler rack elevates food above the ice layer, keeping it completely dry while maximizing cooling efficiency.
How do you keep food from getting wet in a cooler?
The most effective way to keep food dry is to separate it from ice and meltwater using a cooler rack. Place the rack inside your cooler with ice underneath and food containers on top. This creates a barrier that prevents soggy sandwiches, wet produce, and waterlogged meals. Store food in sealed containers and keep frequently used items near the top for easy access without disrupting the cold air circulation below.
How to keep food cold for 3 days while camping?
For three-day camping trips, use block ice instead of ice cubes, it lasts significantly longer and melts slower. Pre-chill your cooler, food, and drinks before packing. Fill empty spaces with frozen water bottles or gel packs to maximize cooling surface area. Keep your cooler in the shade and limit opening it. Use a cooler rack to organize food above the ice, and separate raw meat in sealed containers to prevent cross-contamination while maintaining food safety temperatures below 40°F.
Is it better to leave ice in the bag in a cooler?
Leaving ice in its original bag takes up valuable cooler space and doesn't cool as efficiently as loose ice or block ice. The bag prevents ice from making direct contact with cooler walls and food containers, reducing cooling effectiveness. However, if you must use bagged ice, puncture the bag slightly to allow meltwater to drain, or remove the ice and use it loose. Block ice or frozen gel packs offer better temperature retention for extended camping trips.
What foods should you pack in a cooler for camping?
Pack perishable items like raw meat, dairy, lunch meat, cheese, and prepared meals that require refrigeration below 40°F. Include fresh fruit, vegetables, and condiments. Non-perishable dry goods like crackers, granola, and nuts don't need cooler space. Organize perishables by meal to avoid unnecessary cooler opening. Store raw meat in sealed containers on the lowest shelf or on a cooler rack above ice to prevent cross-contamination with other food items.
How should you layer food and ice in a camping cooler?
Start with a bottom layer of ice or frozen gel packs. Place a cooler rack on top to elevate food above the meltwater. Arrange food containers on the rack, grouping items by meal or use. Add drinks and additional ice around the sides. Keep frequently used items near the top for easy access. This layering strategy maintains cold temperatures, prevents soggy food, and keeps your cooler organized like a fridge during your entire camping trip.
How long does ice last in a cooler?
Ice retention depends on cooler quality, ice type, outside temperature, and how often you open the cooler. Block ice lasts longer than ice cubes. Pre-chilling your cooler, using frozen water bottles to fill empty spaces, and keeping it in the shade extend ice life. Using a cooler rack with proper food organization also reduces the need to dig through ice, which limits cold air loss.