

How to Choose the Right Cooler Size for Any Trip
Last Updated: November 8, 2026
Quick Summary
Choose your cooler size by starting with meals and days rather than the quart rating, then work backward to capacity. Plan on using roughly two-thirds of a cooler's rated quarts for food and drinks, with the rest reserved for ice and gaps. Match head count and trip length using a group-size chart, then confirm interior dimensions fit your tallest gear.
- Two people eating three meals a day for two days need far less space than a family of six on a four-day trip.
- For multi-day warm-weather trips, reserve ice at a 2:1 ratio of ice to food and drinks by volume.
- Perishables should stay at or below 40°F, and food held above that for more than two hours should be discarded.
- Group food by meal so you open the cooler once per meal instead of digging through it.
- Measure interior length, width at the narrowest point, and usable height with the lid closed before buying.
Table of Contents
- Start With Meals and Days, Not Quart Ratings
- What Size Cooler Do I Need for My Group?
- Run the Numbers With a Cooler Capacity Calculator
- How Much Ice for a Cooler Fits Alongside the Food
- How to Pack a Cooler So Size Works in Your Favor
- Match Interior Dimensions to the Gear Going Inside
- Measure Your Cooler Before You Buy a Rack
- Frequently Asked Questions
Start With Meals and Days, Not Quart Ratings
Most people buy a cooler by quart rating and end up disappointed. The number on the box tells you total volume, not usable volume, and it says nothing about how you actually pack food. A big cooler can still leave sandwiches floating in meltwater by day two.
Here is the smarter approach. Start with meals and days, then work backward to capacity. Two people eating three meals a day for two days need far less space than a family of six on a four-day trip.
The quart rating also assumes you fill every corner with ice. Real packing leaves gaps. Food containers are square, cooler walls are not, and drinks need their own zone.
The Two-Third Rule for Real Capacity
A useful rule is to plan on using roughly two-thirds of a cooler's rated quarts for actual food and drinks, with the rest going to ice and empty space around it.
For a deeper trip-by-trip breakdown, our complete cooler size guide walks through real scenarios.
What Size Cooler Do I Need for My Group?
The short answer: match cooler size to head count and trip length, not to a gut feeling in the store aisle. Use this starting framework.
| Group Size | 1 Day | 2-3 Days | 4+ Days |
|---|---|---|---|
| 1-2 people | 20-30 qt | 35-50 qt | 50-65 qt |
| 3-4 people | 30-45 qt | 50-65 qt | 65-90 qt |
| 5-6 people | 45-60 qt | 65-90 qt | 90-120 qt |
| 7+ people | 60-75 qt | 90-120 qt | 120 qt+ |
Treat these as starting points, then adjust. A beach day with drinks only needs less room than a camping trip with raw meat, produce, and leftovers.
Families packing for a crowd should also read our packing guide for large families before committing to a size.
Run the Numbers With a Cooler Capacity Calculator
A cooler capacity calculator is a simple formula, not an app. Multiply your group size by meals per day, then by days. Add drinks separately, then convert to quarts.
Here is the working method we recommend:
- Count eaters and multiply by meals per day.
- Multiply by trip days.
- Estimate about 2 quarts of food space per meal.
- Add 1 quart per person per day for drinks.
- Add 30 percent for ice and air gaps.
- Divide the total by 0.67 to get rated quarts.
A family of four on a three-day trip: 4 eaters × 3 meals × 3 days = 36 meals. That is roughly 72 quarts of food, plus 12 quarts of drinks. Add 30 percent for ice, then divide by 0.67. You land near a 120-quart cooler, or two mid-size coolers that are easier to lift.
Two coolers can also be easier to manage than one giant box, since you can keep the food cooler closed while the drinks cooler gets opened.
How Much Ice for a Cooler Fits Alongside the Food
Ice is the space people forget. A common rule of thumb is a 2:1 ratio, two parts ice to one part food and drinks by volume, for multi-day trips in warm weather. Shorter trips can run closer to 1:1. But the ratio only tells you how much space to reserve.
Start with the temperature of everything going in. A cooler is a box that slows heat transfer, not a refrigerator. Every item you put inside carries its own heat, and that heat has to be absorbed by the ice before the interior can settle at a cold holding temperature.
Then account for the environment. A cooler sitting in direct sun on a 90°F day gains heat through the lid and walls continuously, and every opening exchanges cold interior air for warm outside air. Shade, a reflective cover, and a cooler with a gasketed lid and thick insulation all slow that gain. A hard-sided cooler built for multi-day use generally has thicker insulation than a thin-walled party cooler, and quart ratings measure volume rather than insulation performance.
Here is how to translate the ratio into a realistic plan:
- For a day trip, pack roughly 1:1 ice to contents and expect the ice to be mostly melted by evening in warm weather. That is fine for drinks and short-held food.
- For a two- to three-day trip, use the 2:1 ratio, start with pre-chilled contents, and keep the cooler closed as much as possible. Block ice or frozen water bottles at the bottom extend the cold window because they melt more slowly than cubes.
- For trips of four days or more, plan on replenishing ice or draining meltwater and adding fresh ice at least once, and consider two coolers so one stays sealed while the other is in use.
Watch out: a cooler packed completely full of cubed ice and food leaves no airflow, and the meltwater pools at the bottom where your food sits. Leave a gap, keep food elevated above the ice line, and drain meltwater rather than letting it rise.
Food safety sets the real deadline. Perishables should stay at or below 40°F, and the standard guidance is to discard food that has been held above that temperature for more than two hours. That means the ice plan is not just about keeping drinks cold. Our guide to using block ice for food storage explains how to plan ice volume against food space.
How to Pack a Cooler So Size Works in Your Favor
Packing order decides whether your cooler size actually works, and it also decides how long the cold lasts. Heavy, dense items go on the bottom. Fragile food goes up top, away from meltwater.
Follow this sequence:
- Line the bottom with block ice or frozen water bottles. These melt slowly and form a cold reservoir under everything else.
- Add loose ice around the base, leaving a little room for airflow rather than packing it solid.
- Set drinks in the gaps, since they tolerate contact with ice and are the items you reach for most.
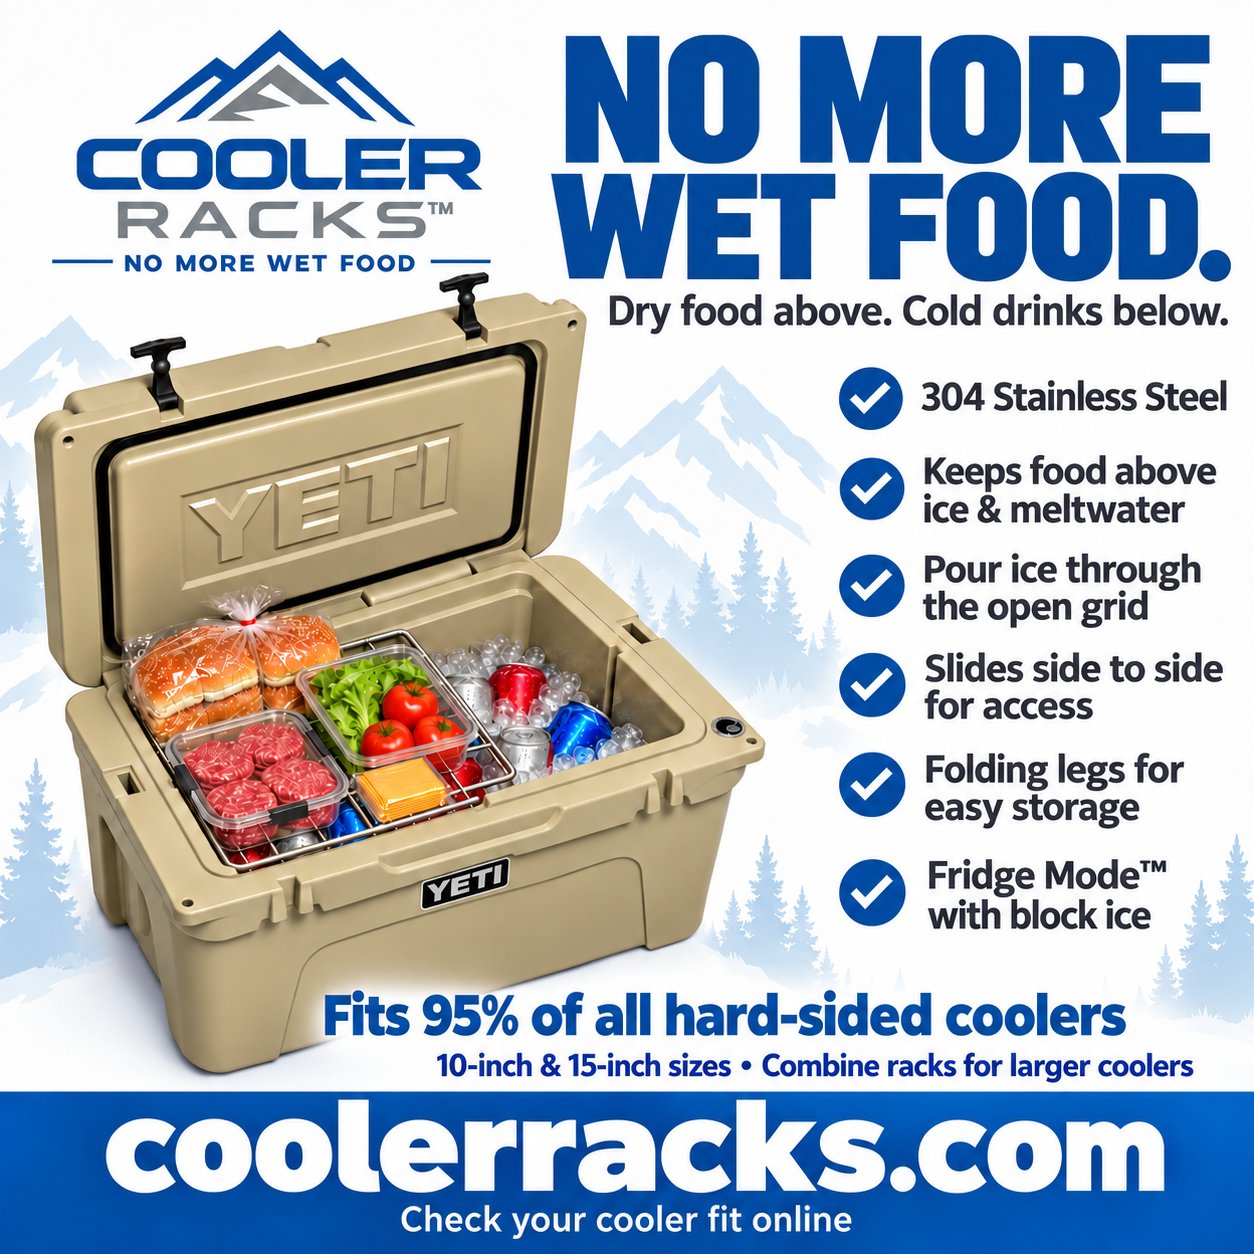
- Place a rack or divider above the ice line so food never sits in meltwater.
- Put food containers, sandwiches, and produce on top, grouped by when you will eat them.
- Fill leftover gaps with a paper towel or cloth to limit air movement, which is what carries heat through the cooler.
Group by meal, not by type. If everything for breakfast sits together at the top and everything for dinner sits together at the bottom, you open the cooler once per meal instead of digging through it. That single habit extends the cold window more than any accessory, because it cuts the number of lid-open events that let warm air in.
Keep the cooler out of direct sun and, when possible, open it once to pull everything you need for a meal rather than opening it repeatedly for individual items. A cooler in shade holds temperature noticeably longer than the same cooler on a sunny tailgate, and a blanket or reflective cover over the lid slows heat gain further.
Our step-by-step guide on the best way to pack a cooler for camping covers this in more detail.
A cooler rack changes the math here. Cooler Racks™ folding 304 stainless steel racks hold food 7 inches above the ice, so meltwater drains below instead of soaking your sandwiches. The 2 x 2-inch grid lets loose ice pass through, and the folding legs store compactly when the cooler is empty. Elevating food also keeps it out of the wettest layer at the bottom, where meltwater collects.
Match Interior Dimensions to the Gear Going Inside
Exterior size lies. Interior dimensions decide what actually fits. A cooler with thick walls can have a surprisingly small inside.
Measure three things before you buy:
- Interior length, wall to wall
- Interior width at the narrowest point
- Usable interior height with the lid closed
Then measure your tallest item. A gallon jug, a stacked container, or a tall bottle can eat most of the height. If you plan to add a rack, subtract its 7 inches from usable height.
What most guides miss is that cooler brands taper the interior. The floor is often smaller than the opening. Measure at the base, not just across the top.
Measure Your Cooler Before You Buy a Rack
A rack only helps if it fits. Cooler interiors vary by brand, age, and model, so measure before you order anything.
Use this checklist:
- Interior length is at least the rack length
- Interior width is at least 11 inches
- Usable height is at least 7 inches with the lid shut
- The lid closes without pressing on the rack
- There is still room for ice around the rack legs
Cooler Racks™ racks come in two sizes. The CR-SS-10 Compact measures 10 x 11 x 7 inches. The CR-SS-15 Full Size measures 15 x 11 x 7 inches. You can use one alone or combine two for a larger cooler. Our compatibility guide on whether cooler racks fit all coolers helps confirm your model before you commit.
For a 25-inch interior, the Full Cooler System bundle pairs a compact and a full-size rack for $59.99. Larger coolers with 30 inches of interior length can take two full-size racks in the Maximum Coverage system at $64.99. Smaller boxes work with the Double Cooler Rack Setup at $54.99, or a single CR-SS-10 Compact Cooler Rack at $29.99.
Getting cooler size right comes down to meals, days, and interior measurements, not the biggest number on the shelf. A well-sized cooler with a rack inside keeps food dry and drinks cold, trip after trip.
Sizing a cooler correctly is the first step. Keeping food dry inside it is the second, and that is where most setups fail. Cooler Racks™ builds folding 304 food-grade stainless steel racks that hold food 7 inches above ice and meltwater, with a 2 x 2-inch grid that lets loose ice drain through. The racks are rust-resistant, dishwasher safe, and fold flat for storage. Get started with Cooler Racks™ and pack a cooler that keeps sandwiches dry from the first mile to the last.
Frequently Asked Questions
What size cooler do I need for a weekend trip?
For two people on a two-night trip, a 45 to 55 quart hard-sided cooler covers food and ice if you pack efficiently. Remember that ice takes up space, so a cooler's rated capacity overstates how much food and drink it holds once ice is added.
How much space should I leave for ice in a cooler?
Block ice lasts longer than cubes, so it can be a practical choice for multi-day trips. Leaving that space also lets cold air circulate, which keeps drink temperature steadier.
Does cooler size affect how long ice lasts?
Yes. A fuller cooler holds cold longer because there is less air to warm the ice, and larger coolers with thicker walls slow heat transfer. A half-empty large cooler loses ice faster than a tightly packed smaller one. Pre-chilling the cooler and using block ice alongside cubes stretches cooling time further, especially in high ambient temperatures.
Should I get one large cooler or two smaller coolers?
Two smaller coolers often work better for groups because you open the drinks cooler frequently and keep the food cooler sealed. Every time a lid opens, cold air escapes. If you go with one large cooler, use an interior rack to separate food from ice and organize contents so you are not digging around, which keeps the lid open for shorter periods and protects food from meltwater.
Cooler rack system prices
